Preface
I hope it's OK that I'm posting this review. I'm not certain if Brian wants information about his project to be disclosed publicly yet. I asked Brian via a private e-mail if it was OK to post about this, but he's probably in bed right now and I haven't seen a response yet. Oh, and there's that other issue where my mail server seems to like bouncing messages from his address...

Anyway, I'm so excited about this that I couldn't wait any longer. So here we go.
Backlit buttons!
Brian just gave me a crack at one of his first backlit button kits. He's almost ready to start making these publicly available, and he wanted a guinea pig to help him work the kinks out of the system. I sent him the cash last week, and received the kit in the mail today. Began work on it immediately after I got home, and it took several hours to complete. I took lots of notes, and I just sent off my notes to him.
By pure coincidence, Mark Lord graced us with his presence again today, and I took the opportunity to ask him if he would please add Brian's button-light-activation code to his default Hijack kernel. I did this even before I knew that the parts had arrived in the mail. I got home tonight, ready to install the kit, and found that Mark had put up Hijack 202 just in the nick of time. Thanks, Mark!
So, what does it look like?!
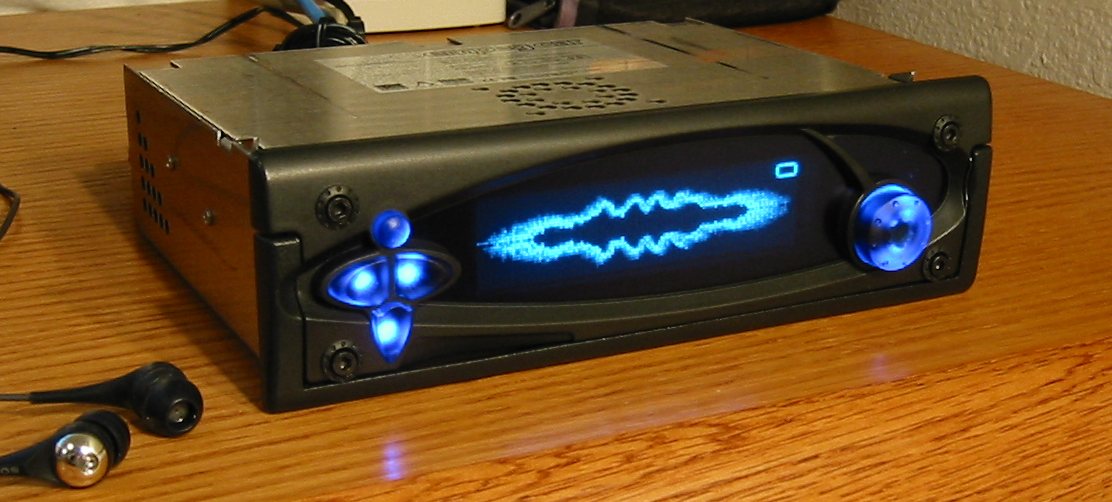
The file attached to this message
here is a photo of what the player now looks like sitting on my desk as I type this. Note that since all Brian had were blue buttons to send me, I have changed the player screen color from green to blue, just so I could match.
As you can see, it is the business. It is the shiznit. It is the bee's knees. Words cannot describe how utterly cool this is.
One thing you can't see from the photo is that the shade of blue of the buttons is slightly different than the shade of blue of the screen. My digital camera isn't the best at capturing the subtleness of the hues coming from the player's screen, so the photo makes the buttons look like a perfect match. In real life, they are close, but not exactly the same. Since we know that there is a lot of variation in the screen hues, it's not going to be possible for Brian to match the hues perfectly. I think that he's gotten it quite close, and it looks fantastic. In fact, I think the slight difference in hue looks really good, and now I'm curious to try it with blue buttons and a green screen.
Assembly
I'm going to say this right off the bat right now...
THIS IS SERIOUSLY HARD CORE.
This is not an easy hack. It is nerve-wracking and a complete pain in the ass to do. You have no idea how frigging small these surface-mount components are until you've actually tried to solder them yourself. You must be extremely good with a soldering iron if you want to do this.
Let me strengthen that statement. You must be better than the best solderer you know. Think about your skill with a soldering iron objectively for a moment. When you look at other people's soldering jobs, do you think "I could do better than that with my eyes closed"? You have to be twice as good as that.
The surface-mount components required here are basically the size of a flea with anorexia. Imagine having to flow the solder onto
just one tiny part of something that small. The resistor pack that solders onto the display board has eight tiny pads that must each be soldered individually, and if the solder fills any of the gaps between the pads, you're hosed.
I was able to do it, but just barely. I'm worried that it's going to stop working after a few thermal cycles of my player because my solder joints on the resistor pack will come loose.
Fortunately, the resistor pack was the hardest part. Assembling the knob-board and soldering the LEDs into the buttons was pretty easy by comparison. The components that went onto the knob-board were just as small as the resistor pack, but at least they didn't have rows of tightly-spaced connection points. After doing the resistor pack, the knob-board was a walk in the park. I still wouldn't recommend it for anyone who has even the slightest doubts about their soldering skills, though.
The tails of the LEDs didn't quite "drop" into the button holes, they required some coaxing and bending before they would go through. At least on my board, that's how it worked out. YMMV.
After testing with a multimeter and discovering to my amazement that the resistor pack was soldered correctly, I hooked up power. And discovered I had soldered in the top LED backwards, it didn't light up. D'OH! Desoldering that bugger was a pain. So, I warn you now: Triple check Brian's illustrations and make sure you really are following them!
I had some difficulty fitting the knob properly after the knob-board was installed, but I was able to resolve the issue with some ingenuity and modding. I have confidence that Brian will be able to make it work more universally when he starts shipping these things for real.
And while I'm on the subject of the knob-board, I just want to say that it's a tiny little work of art. Quite clever, how he worked it all out so that it lights the knob properly.
Oh, and as long as we're talking about works of art...
The Buttons
Absolutely impeccable castings. The texture and shape is fantastic. No bubbles or cracks.
I had a slight problem with the knob, which is that somehow it came out kind of oblong instead of perfectly circular. But this is no big deal, I think this was an early prototype knob and he'll hopefully be able to correct it in future castings. You can't tell the knob is out of round when it's installed on the player, it just looks normal.
The plastic of these knobs is a touch more "brittle" than the plastic used in the original knobs. For some reason, this makes the knob grip the shaft less tightly than the original knobs.
I have a Mark2 with the round (non-keyed) encoder shaft. Some of you may remember that the very first Mk2 shipments had their knobs slip on the shaft, so they redesigned the knobs to grip better and gave replacements to Mk2 owners. With these replacement knobs, there was a rubber O-ring included. The O-ring made the knob grip even tighter. Well, I never needed the O-ring with the original replacement knob, but I kept it just in case. Well, with these translucent knobs, you need the O-ring. Glad I kept it. Now that the O-ring is in place, it's very solid and does not slip on the shaft.
Since I don't have a 2a to play with, I can't comment on how the knob would work with a 2a.
The four buttons fit perfectly. Brian did an amazing casting job. They are slightly more sensitive to fascia position than the original buttons, so you have to be careful about scooching the fascia into the right position before cinching down the hex screws, but as long as you're careful and you don't make the hex screws more than finger-tight, the buttons work great.
Brian has stated that he intends to experiment with different compounds to make the buttons distribute light more evenly. I would like to see this happen eventually, but even without this feature, the buttons look fantastic.
When the buttons are not backlit, they appear very very dark. Almost black, in fact. This actually looks quite cool on the face of the "powered off" player, giving it a sleek stealthy look reminiscent of the Mk1.
I would assume that any compounds used to spread the light more evenly would make the plastic color lighter, too. That means that if you want blue buttons, they would appear to be a milky sky-blue in regular light. This might or might not look good, I don't know. Personally, I'd like to see Brian take a stab at grayish translucent buttons. I think that buttons backlit in a neutral gray tone would look fantastic when set against the colored player lens. Well, let's just hope Brian get the time to work more on this and come up with different things to try.
Summary
On the Spinal Tap scale:
Coolness factor: 11
Installation difficulty: 9.5
Should you do this to your player? If you really think you can solder an eight-pad SMT resistor pack onto an irreplaceable display board, then it's a no-brainer. This looks awesome. And your player will be the star of the next owner's meet.
If you can't do the soldering, then I suggest making friends with someone who can. Buy them lunch. Or flowers. Or a Porsche. Whatever it takes.

 Previous Topic
 Index
Index
