#368418 - 26/02/2017 17:35
 Finished project
|
carpal tunnel

Registered: 19/01/2002
Posts: 3582
Loc: Columbus, OH
|
I mentioned in Mark's thread about his house that I was working on building furniture in my carport. This morning I finally finished a desk I built for my wife (that I promised her back in September). Done with only a Skil-saw, a drill, a sander, and couple hand tools. I did cheat and buy the front table legs on Ebay ($8/pair!) and then modify them to graft them into the project.
I still look at it and see all the mistakes, like the uneven drawer gaps from free-handing the cuts with a skil-saw, but the wife is happy, so I guess that's what matters.
Attachments

_________________________
~ John
|
|
Top
|
|
|
|
|
#368420 - 26/02/2017 19:40
Re: Finished project
[Re: JBjorgen]
|
carpal tunnel

Registered: 08/03/2000
Posts: 12318
Loc: Sterling, VA
|
That's beautiful! Fantastic job with that set of tools!
What did you use for the little details in the middle? Was that the skil-saw too?
What did you use for the top, and how is it attached? What did you use for hardware on the drawers?
_________________________
Matt
|
|
Top
|
|
|
|
|
#368422 - 26/02/2017 21:43
Re: Finished project
[Re: JBjorgen]
|
veteran

Registered: 21/03/2002
Posts: 1424
Loc: MA but Irish born
|
...but the wife is happy, so I guess that's what matters.
Yup! PS Awesome work, looks great!
|
|
Top
|
|
|
|
|
#368424 - 27/02/2017 14:00
Re: Finished project
[Re: JBjorgen]
|
carpal tunnel

Registered: 29/08/2000
Posts: 14477
Loc: Canada
|
Super job, John!
It is quite amazing how two little bits of scroll work can transform simple boxes into something rather elegant! The magic of good design!
Cheers
|
|
Top
|
|
|
|
|
#368425 - 27/02/2017 16:01
Re: Finished project
[Re: JBjorgen]
|
carpal tunnel

Registered: 08/07/1999
Posts: 5539
Loc: Ajijic, Mexico
|
Awww, I coulda done that without even the SkilSaw or the drill. Just go down to Ikea, get out my credit card, ask if they deliver...
No, really, that is very nice work, John. I pat myself on the back any time I manage to screw a pair of shelf brackets onto the wall and have it come out almost level.
tanstaafl.
_________________________
"There Ain't No Such Thing As A Free Lunch"
|
|
Top
|
|
|
|
|
#368426 - 27/02/2017 17:38
Re: Finished project
[Re: JBjorgen]
|
carpal tunnel

Registered: 20/12/1999
Posts: 31565
Loc: Seattle, WA
|
|
|
Top
|
|
|
|
|
#368427 - 27/02/2017 18:35
Re: Finished project
[Re: JBjorgen]
|
carpal tunnel

Registered: 13/02/2002
Posts: 3212
Loc: Portland, OR
|
Nice desk! I still look at it and see all the mistakes, like the uneven drawer gaps from free-handing the cuts with a skil-saw As a fellow skil-saw-only * builder, there are a couple of things you can do to help with that. First, clamp a straight edge for a guide. Don't trust dimensional lumber like a two-by-four to be straight, but the factory edge of plywood is usually (but not always) okay. Which side of the line you put the guide on depends on whether or not the skil-saw motor can clear the clamps+straight edge, but if you can, clamp the straight edge so that any saw wobbles go into the waste, rather than into your good piece. Second, if you're looking for a finished edge, don't cut on the line, cut on the waste side of the line by a few mm, and then sand/plane to the line. * I actually have not one, but two table saws, both of which are in pieces, and have been since I bought the darned things 6 years ago. Since furniture-making is a distant goal, and I mostly just need a saw to rip sheet goods, the adequacy of the skil-saw makes assembling the table saws a low priority.
|
|
Top
|
|
|
|
|
#368428 - 27/02/2017 18:48
Re: Finished project
[Re: JBjorgen]
|
carpal tunnel
Registered: 29/08/2000
Posts: 14477
Loc: Canada
|
For people without space/money for a dedicated workshop, probably the best power tool to get (after a decent cordless drill) would be a Track Saw. It is basically a Skilsaw on steriods, but way way more than that. A woodworker friend of mine has built high-standard complete kitchen cabinetry with one, using the living room carpet as his workshop. Without creating much of a mess, either. The dust collection (using a shopvac) on these is generally unbelievably good. I have the Makita version, and both a 5' track and a 9' track. Absolutely excellent. But even the lowly ShopFox versions ought to be way better than the non-tracked alternatives. We use an 8'x4' sheet of rigid foam (insulation) as a work surface (on the floor), placing the sheet goods on top of it so that the blade can be set to cut through the wood into the top 1/16" of the foam. Excellent straight, splinter-free cuts, with no big mess. Cheers
|
|
Top
|
|
|
|
|
#368429 - 27/02/2017 20:13
Re: Finished project
[Re: mlord]
|
carpal tunnel
Registered: 20/12/1999
Posts: 31565
Loc: Seattle, WA
|
I didn't know about track saws, that's cool. Next time I need to do a job like that where I wished I had room for a table saw, I will consider getting one of those instead.
|
|
Top
|
|
|
|
|
#368431 - 28/02/2017 00:39
Re: Finished project
[Re: tanstaafl.]
|
old hand
Registered: 27/02/2003
Posts: 770
Loc: Washington, DC metro
|
Awww, I coulda done that without even the SkilSaw or the drill. Just go down to Ikea, get out my credit card, ask if they deliver...
No, really, that is very nice work, John. I pat myself on the back any time I manage to screw a pair of shelf brackets onto the wall and have it come out almost level.
tanstaafl. I can do level - I just want them to stay up! (I'm always worried I'll just nick the studs and not get a good hold...)
|
|
Top
|
|
|
|
|
#368432 - 28/02/2017 00:57
Re: Finished project
[Re: Dignan]
|
carpal tunnel
Registered: 19/01/2002
Posts: 3582
Loc: Columbus, OH
|
What did you use for the little details in the middle? Was that the skil-saw too?
I must admit I cheated on those too. Since I don't have a router to do the detail work, I was walking around Home Depot and found this curtain rod hanger, So I cut it in half and sanded it and filled the holes. 
_________________________
~ John
|
|
Top
|
|
|
|
|
#368433 - 28/02/2017 01:01
Re: Finished project
[Re: JBjorgen]
|
carpal tunnel
Registered: 19/01/2002
Posts: 3582
Loc: Columbus, OH
|
The table legs were these: ebay legs, so I had to modify the shape of the top to graft into a regular 2x2 with a dowel and glue to hold them together. Then they were too long, so I cut off the bottom and rounded them off a bit.
_________________________
~ John
|
|
Top
|
|
|
|
|
#368434 - 28/02/2017 01:12
Re: Finished project
[Re: Dignan]
|
carpal tunnel
Registered: 19/01/2002
Posts: 3582
Loc: Columbus, OH
|
What did you use for the top, and how is it attached? What did you use for hardware on the drawers?
The top is a simple 18mm sheet of plywood with a stamped decorative moulding mitered and attached around the edges to hide the plywood layers. It's attached with 1.5 inch headless nails. I used nail set to tap them below the surface and filled the holes with resin. I didn't glue the top because I'd like to make a solid wood top for it someday. The drawer hardware are antique (or oldish anyway) glass knobs that my wife ordered off Ebay. The slides are just typical ball-bearing cabinet drawer slides from Home Depot. 
_________________________
~ John
|
|
Top
|
|
|
|
|
#368435 - 28/02/2017 01:20
Re: Finished project
[Re: mlord]
|
carpal tunnel
Registered: 19/01/2002
Posts: 3582
Loc: Columbus, OH
|
For people without space/money for a dedicated workshop, probably the best power tool to get (after a decent cordless drill) would be a Track Saw. It is basically a Skilsaw on steriods, but way way more than that. After getting completely frustrated when cutting this desk out, for Christmas someone gave me an Amazon gift certificate so I bought a Kreg Rip-Cut tool. I've only used it twice since then, but other than being bulky, I'm happy enough with the straightness of the cuts. The disadvantage is that you have to have straight edges to start with. With a track saw you can mill your own edges. The advantage is that it's $30 instead of $300+.
_________________________
~ John
|
|
Top
|
|
|
|
|
#368436 - 28/02/2017 02:00
Re: Finished project
[Re: JBjorgen]
|
carpal tunnel
Registered: 29/08/2000
Posts: 14477
Loc: Canada
|
The ShopFox track saw (or Grizzly) is usually the cheapest.
Dunno how good that one is, but the online reviews
suggest it is effective after making a few tweaks to it.
The Makita and Festool models are the cream of the crop,
with the former priced at about half of the latter,
and no significant difference in quality or performance
(I have used both, and bought the Makita for here).
There are also "track" thingies to add to a basic Skilsaw,
but those are not at all the same as a proper track saw.
A track saw track, has a (replaceable) zero-clearance edge
at the cut line, so no top splintering of the material,
and really easy set-up: just line that edge of the track
to exactly where you want the cut, and that's where it will cut.
No weird offset measurements or anything.
So anyone starting out, or looking for an upgrade in saws,
take a good close look at track saws. They really are fantastic,
and can replace a tablesaw for many purposes. They can
actually cut straighter lines, and on crooked materials.
Edited by mlord (28/02/2017 02:19)
|
|
Top
|
|
|
|
|
#368437 - 28/02/2017 02:09
Re: Finished project
[Re: mlord]
|
carpal tunnel
Registered: 19/01/2002
Posts: 3582
Loc: Columbus, OH
|
Of course it comes without tracks or clamps or anything else, so you're pushing $250-$300 to get it to be usable.
_________________________
~ John
|
|
Top
|
|
|
|
|
#368438 - 28/02/2017 02:15
Re: Finished project
[Re: JBjorgen]
|
carpal tunnel
Registered: 29/08/2000
Posts: 14477
Loc: Canada
|
Oh, I missed that. Not much point of a track saw without the track!
The other "accessories" are not at all necessary. These tracks just sit on top of the work and stay in place with friction. Clamps generally not required -- I wasted $35 on clamps for mine, and have never gotten them out of their packaging.
Cheers
|
|
Top
|
|
|
|
|
#368439 - 28/02/2017 02:56
Re: Finished project
[Re: JBjorgen]
|
carpal tunnel
Registered: 08/03/2000
Posts: 12318
Loc: Sterling, VA
|
Tommy on This Old House has been using a Festool track saw for a few years now, and I salivate every time I see it. He has a whole bunch of Festool equipment, most of which has the vacuum attachment to seriously cut down on sawdust. A boy can dream... I currently have a DeWalt circular saw, so I'll have to look at that Kreg thing you linked to, John. I had been meaning to look for some sort of straight edge to use as a table saw replacement, because I don't have the space or money for a table saw  But I could drop $25 on a distant facsimile that requires a bunch of offset measurements
_________________________
Matt
|
|
Top
|
|
|
|
|
#368440 - 28/02/2017 03:19
Re: Finished project
[Re: JBjorgen]
|
carpal tunnel
Registered: 29/08/2000
Posts: 14477
Loc: Canada
|
On the cheaper end of the scale, it is quite easy to make a DIY "track" for use with any circular saw and/or router. Just need a strip of 1/8" thick material ("hardboard", "masonite", or whatever they call it where you live), about 10" wide and as long as you want your "track" to be. This piece doesn't even need to be straight. The second thing needed is a _straight_ length of something (eg. factory edge from 1/2" plywood, or more masonite, or..), perhaps 2-4" wide, which you glue to the top of the first piece, to become its "guide rail". The circular saw (or router) then rides on top of the first piece, tight against the second piece. The first time it is used, it trims the first piece flush with its blade, creating a zero-clearance guide for future cuts. Dirt cheap and easy to make, but it does normally require clamps to hold it in place when in use, which means it also then requires sawhorses or something to elevate it so the clamps can be used. Terrible description, I know, but photo attached. Note that the saw in the photo is not the one I actually used with the guide (the original saw was larger), but it does illustrate how it would work. EDIT: Here is an article showing the concept more clearly: http://www.woodworkersjournal.com/making-straight-cuts-with-a-circular-saw/ Description: DIY saw guide track for Skilsaw style machines. Description: DIY saw guide track for Skilsaw style machines.
|
|
Top
|
|
|
|
|
#368441 - 28/02/2017 04:23
Re: Finished project
[Re: JBjorgen]
|
carpal tunnel
Registered: 19/01/2002
Posts: 3582
Loc: Columbus, OH
|
Thanks Mark. That would make a good complement to the Kreg tool, which does have some limitations. And the price point is right in my range
_________________________
~ John
|
|
Top
|
|
|
|
|
#368442 - 28/02/2017 05:45
Re: Finished project
[Re: JBjorgen]
|
old hand

Registered: 01/10/2002
Posts: 1033
Loc: Fullerton, Calif.
|
This is what I do. It also had the advantage that I can throw it away when done and build another the next time I need one, 5 years later...
My garage is more about metal work.
|
|
Top
|
|
|
|
|
#368443 - 28/02/2017 06:20
Re: Finished project
[Re: JBjorgen]
|
carpal tunnel
Registered: 08/03/2000
Posts: 12318
Loc: Sterling, VA
|
Good suggestion, Mark! And that's probably the exact same saw I have, actually. I'm in the DeWalt ecosystem. Any other invaluable tools you'd recommend for general work around the house? So far I have:
impact driver
hammer drill/driver
drill
reciprocating saw
circular saw
Those are all on the 20v Max system. I keep a tool bag for work, but of course I mostly use that hammer drill/driver for everything.
_________________________
Matt
|
|
Top
|
|
|
|
|
#368444 - 28/02/2017 16:28
Re: Finished project
[Re: JBjorgen]
|
carpal tunnel
Registered: 19/01/2002
Posts: 3582
Loc: Columbus, OH
|
Matt, if you're working with anything other than wood, a 4.5 inch angle grinder is a fantastic all-purpose tool you can use to cut concrete, metal, masonry, rusted bolts, etc.. You can also put wire wheels or flap discs on them to clean up rusted or painted metals, etc.. I use mine quite a bit, but then again they don't build anything out of wood here in Mexico.
_________________________
~ John
|
|
Top
|
|
|
|
|
#368445 - 28/02/2017 18:07
Re: Finished project
[Re: Dignan]
|
carpal tunnel
Registered: 13/02/2002
Posts: 3212
Loc: Portland, OR
|
Any other invaluable tools you'd recommend for general work around the house? Your list is pretty decent already, and will get you most of the way to anywhere, assuming you also have standard things like screwdrivers, a hammer, tape measure and a ladder. The thing about "general work around the house" is that it can mean anything, so the best thing to do is just buy your tools as projects come up. For example -- I had to replace the subfloor in a laundry room, after the washer leaked and the existing particle board subfloor absorbed all the water and deformed. That's when I upgraded my anemic cordless circular saw to my current one, and bought a pry bar (because trying to use the claw end of a hammer sucked). So now I have a pry bar in my arsenal of tools for general work around the house. It's nice, but certainly not something I'd say, OMG, you *have* to get one of these -- because the truth is, you can get by just fine without one for years. And that's really true of a lot of tools. My non-contact voltage tester pen, (crappy) chisel set, mitre box and cross-cut saw, level, hacksaw, aviation snips, and a host of other tools arrived similarly. I think I have 5 tools that I bought "because I should have these", rather than "because I need it for my current project." Two table saws, a router with router table (it was a good deal at a garage sale), a belt sander, and a pair of drywall T-squares. Of those, I have only ever used the drywall T-squares. The rest just take up space in my garage.
|
|
Top
|
|
|
|
|
#368446 - 28/02/2017 22:03
Re: Finished project
[Re: JBjorgen]
|
carpal tunnel
Registered: 29/08/2000
Posts: 14477
Loc: Canada
|
Matt, if you're working with anything other than wood, a 4.5 inch angle grinder is a fantastic all-purpose tool you can use to cut concrete, metal, masonry, rusted bolts, etc.. You can also put wire wheels or flap discs on them to clean up rusted or painted metals, etc.. I use mine quite a bit, but then again they don't build anything out of wood here in Mexico. Ditto. Got one last year, and use it weekly for any number of oddball tasks. I also got the DeWalt cordless multi-tool thing --> I've had a corded Fein one for decades now, and it is an amazing problem solver. But horribly inconvenient to use: no quick-change arbor, and that long cord that needs an outlet. Thus the DeWalt cordless. It is nowhere near the quality or smoothness of the Fein, but more than Good Enough for everything so far. Oddly, I have never used either version for their original intended purpose as a sander!
|
|
Top
|
|
|
|
|
#368447 - 28/02/2017 22:05
Re: Finished project
[Re: JBjorgen]
|
carpal tunnel
Registered: 29/08/2000
Posts: 14477
Loc: Canada
|
Thanks Mark. That would make a good complement to the Kreg tool, which does have some limitations. And the price point is right in my range I figured such! One tip: make it wider than I (or the article) suggested. Like, perhaps 14-15" wide instead of 10-12". That way you'll often be able to position the necessary clamps far enough to the side that the saw motor doesn't want to bump into them in use. The first one of these I ever made was that wide, and the top piece was just a 3-4" wide strip of 1/2" ply more or less down the middle. I used one side with the circular saw, and the other side with a router. Cheers
Edited by mlord (28/02/2017 22:07)
|
|
Top
|
|
|
|
|
#368448 - 01/03/2017 19:19
Re: Finished project
[Re: mlord]
|
carpal tunnel
Registered: 08/03/2000
Posts: 12318
Loc: Sterling, VA
|
Matt, if you're working with anything other than wood, a 4.5 inch angle grinder is a fantastic all-purpose tool you can use to cut concrete, metal, masonry, rusted bolts, etc.. You can also put wire wheels or flap discs on them to clean up rusted or painted metals, etc.. I use mine quite a bit, but then again they don't build anything out of wood here in Mexico. That's a good idea, but I'm not sure if I have many times that I'd use that. I do have a rusting iron fence that guards a walk-up basement in my back yard. I could use it to get the paint and rust off and repaint it, but I don't think it's worth the effort. It's not the most substantial fence, and the area where the fence meets the concrete is the most rusted. I'm not actually sure what to do about it. Any tips? Or should I be thinking about taking the whole thing out, drilling new holes in the concrete, and starting over again? I also got the DeWalt cordless multi-tool thing... That might be more up my alley. I do a lot of drywall cut outs for low voltage plates, and feel like that could make my job easier. Although a good old drywall saw does the job too. But I also need a sander... Ok I guess I'm just looking for an excuse to buy more tools, which I really don't need. I just got the supplies I need yesterday to replace the shelves in our hall closet. We have a unique triangular-shaped closet that I can't get premade shelves for, and the current ones only come out halfway, so I effectively lose more than half the possible storage space. I'm going to cut up some plywood, attach cleats to the walls to hang them on, and put a decorative edge on the front like John did to the desk. Wish me luck!
_________________________
Matt
|
|
Top
|
|
|
|
|
#368462 - 09/03/2017 18:46
Re: Finished project
[Re: mlord]
|
pooh-bah
Registered: 27/02/2004
Posts: 1900
Loc: London
|
For people without space/money for a dedicated workshop, probably the best power tool to get (after a decent cordless drill) would be a Track Saw. Agreed, they're brilliant. We make jigs from scarps for the router
|
|
Top
|
|
|
|
|
#368463 - 09/03/2017 18:50
Re: Finished project
[Re: JBjorgen]
|
pooh-bah
Registered: 27/02/2004
Posts: 1900
Loc: London
|
Sorry, forgot to say that's way more complex than anything we've done. Looks great.
|
|
Top
|
|
|
|
|
#368464 - 09/03/2017 19:05
Re: Finished project
[Re: JBjorgen]
|
pooh-bah
Registered: 27/02/2004
Posts: 1900
Loc: London
|
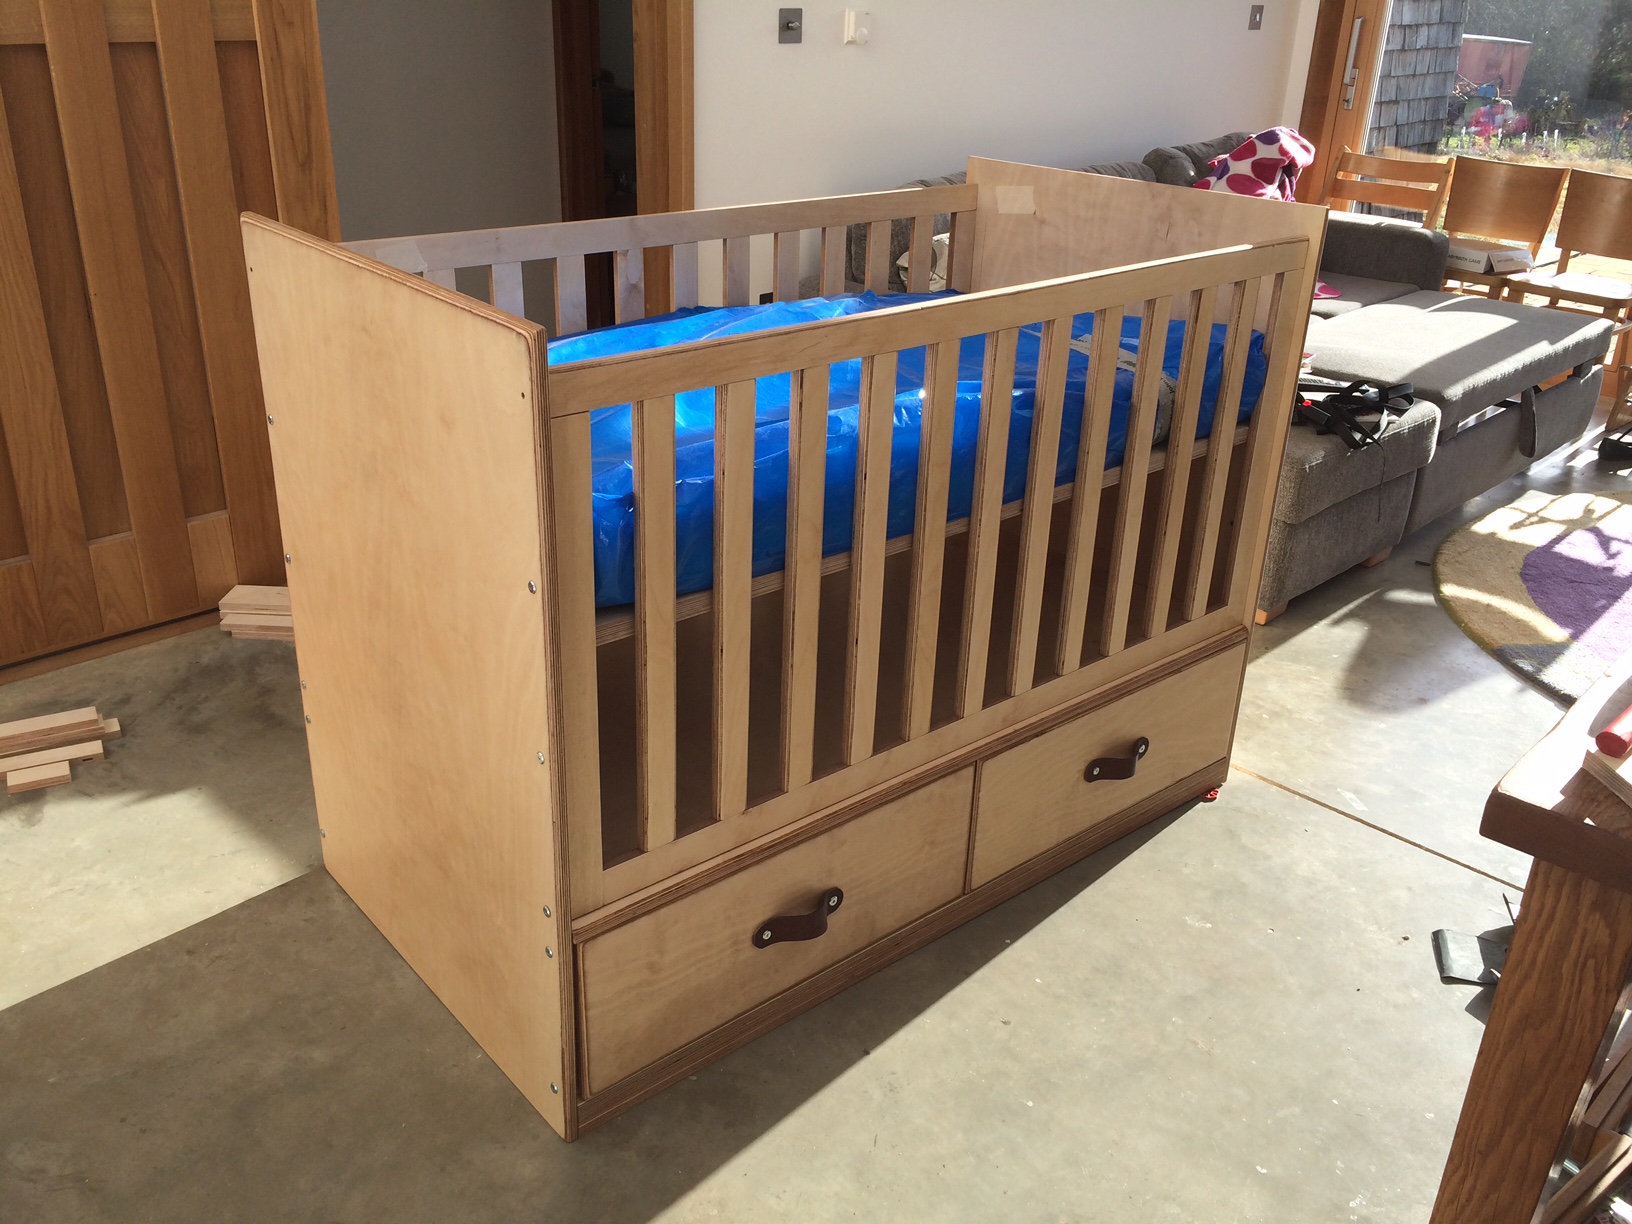
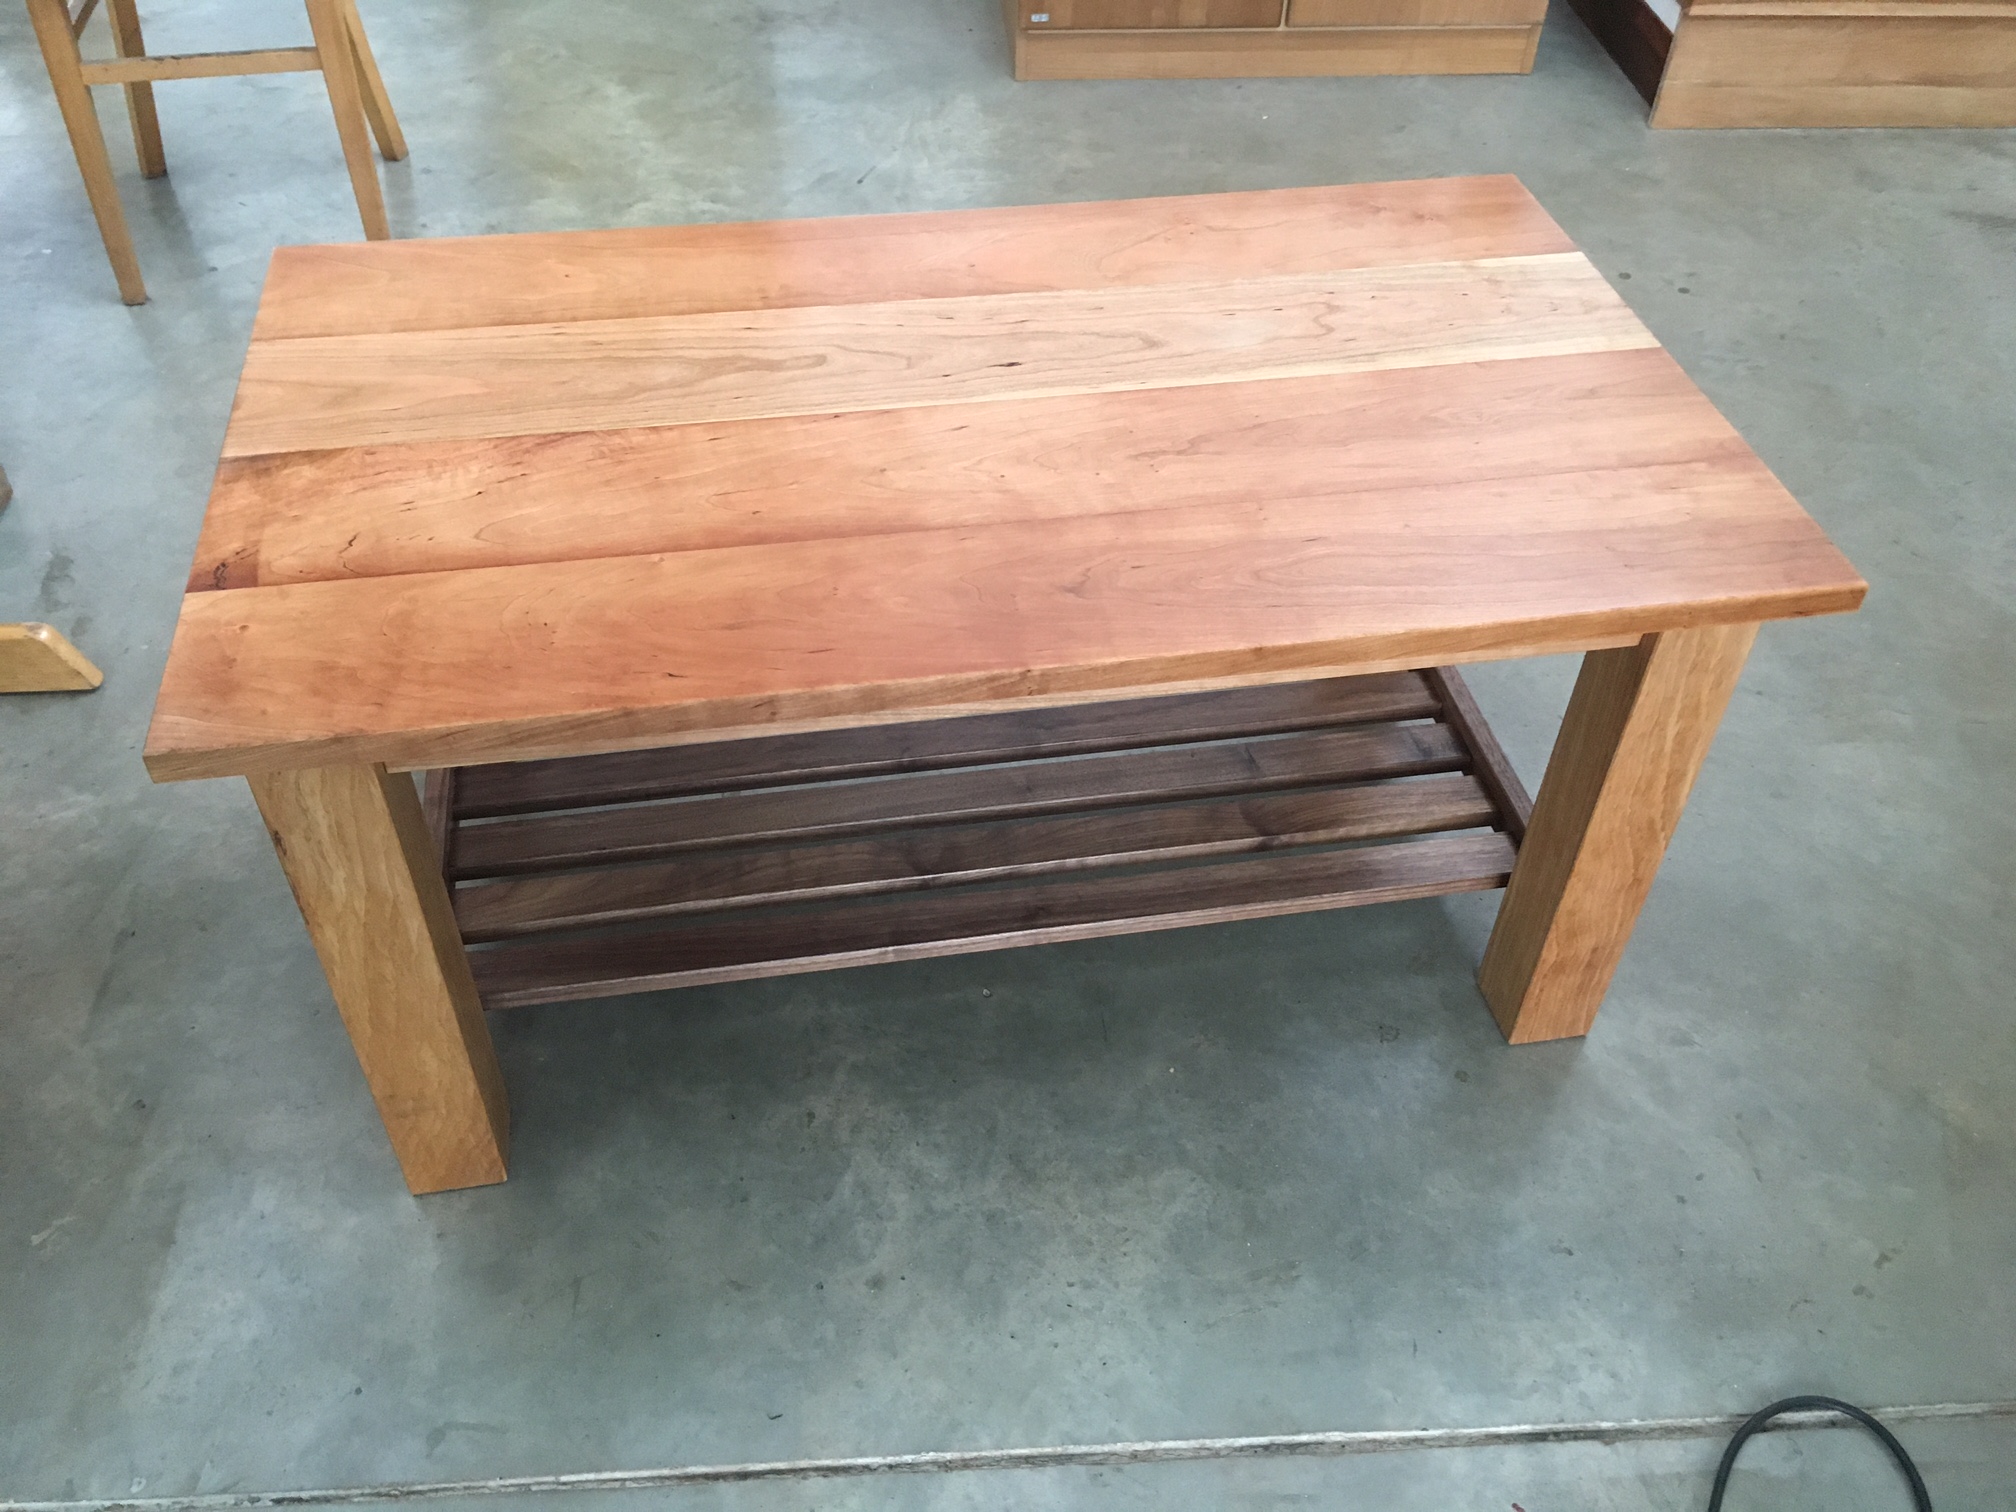
These are the most complex pieces we've done yet. In the middle of a whole bedroom at the moment and then hopefully our solid cherry dining table which started off as raw timber, wiggly bits will be straightened using track saw and then thicknessed.
Attachments
Cot.JPG (91 downloads)Coffee Table.JPG (207 downloads)
|
|
Top
|
|
|
|
|
#368465 - 10/03/2017 05:52
Re: Finished project
[Re: JBjorgen]
|
carpal tunnel
Registered: 19/01/2002
Posts: 3582
Loc: Columbus, OH
|
Nice work! Actually, I think the crib (cot?) looks every bit as complex as the desk.
I'm still looking for a place to buy hardwoods here in Guadalajara. The desk is just made from whatever I could find at Home Depot, but I'd love to do some projects like your coffee table with some quality wood. Not sure if they would have the same stuff as we have in the US, but they have different hardwoods that are quite beautiful.
I'm also thinking about trying my hand at some raw wood furniture projects. I've been a little jazzed to try it since we bought our dining room table, which is a big piece of mesquite. I'll have to see if I can dig up a picture.
_________________________
~ John
|
|
Top
|
|
|
|
|
#368466 - 10/03/2017 06:03
Re: Finished project
[Re: JBjorgen]
|
carpal tunnel
Registered: 19/01/2002
Posts: 3582
Loc: Columbus, OH
|
I'll have to see if I can dig up a picture. Found one. Just ignore the child at the end of the table. I had this custom made for $5500 pesos or roughly $275 USD. I'm thinking a piece of mesquite this big would be worth a bit more than that in the US. 
_________________________
~ John
|
|
Top
|
|
|
|
|
#368467 - 10/03/2017 11:40
Re: Finished project
[Re: tahir]
|
veteran
Registered: 25/04/2000
Posts: 1522
Loc: Arizona
|
You guys continuously amaze me.
The other day I was impressed that I used an impact driver correctly, didn't lose a digit, didn't bring the house down, and managed to remove and then reinstall a set of blinds clips successfully.
|
|
Top
|
|
|
|
|
#368468 - 10/03/2017 12:38
Re: Finished project
[Re: JBjorgen]
|
carpal tunnel
Registered: 29/08/2000
Posts: 14477
Loc: Canada
|
I had this custom made for $5500 pesos or roughly $275 USD. I'm thinking a piece of mesquite this big would be worth a bit more than that in the US. I am about to become part-owner of a wood supply business, and one of their specialties is large slabs like that one. They have a couple of very large custom rigs for milling the raw wood dead flat with parallel faces. The slabs are then offered in that form, requiring fine sanding, a finish, and legs. But they'll also pre-finish and/or add legs as asked. Quite the sight, a room full of those! If all goes well, I do hope the next worktable in my office here will be a live edge slab. Cheers!
|
|
Top
|
|
|
|
|
#368469 - 10/03/2017 13:35
Re: Finished project
[Re: mlord]
|
carpal tunnel

Registered: 10/06/1999
Posts: 5914
Loc: Wivenhoe, Essex, UK
|
The slabs are then offered in that form, requiring fine sanding, a finish, and legs.
They sound great, can you pop a couple in the mail 
_________________________
Remind me to change my signature to something more interesting someday
|
|
Top
|
|
|
|
|
#368470 - 10/03/2017 17:09
Re: Finished project
[Re: andy]
|
carpal tunnel
Registered: 19/01/2002
Posts: 3582
Loc: Columbus, OH
|
They sound great, can you pop a couple in the mail Yeah, my wife says "You realize that we have to take that with us whenever we go back to the US." (which won't be anytime soon) I'm trying not to imagine what it'll cost to ship that thing. It might be cheaper to buy a trailer and tow it up and then sell the trailer on the other side. Which, since the conversation is wandering anyway, reminds me of a story. When I was in Belize, there was a guy who drove down every winter from the US with a trailer for his belongings. Every year, he would rebuild the box of the trailer completely out of mahogany (which is dirt cheap in Belize), then tow it back to the US. Because it was a US tagged trailer, he didn't pay any import duty on the trailer itself. He would then disassemble the trailer, sell all the wood to help finance his trip, and rebuild the trailer out of whatever was cheap to bring back down. I always thought it was a cool way to work the system.
_________________________
~ John
|
|
Top
|
|
|
|
|
#368471 - 10/03/2017 17:16
Re: Finished project
[Re: mlord]
|
carpal tunnel
Registered: 19/01/2002
Posts: 3582
Loc: Columbus, OH
|
If all goes well, I do hope the next worktable in my office here will be a live edge slab.
Just a word of warning, even if they start out dead flat, they may not stay dead flat. The mesquite table changes with the seasons and the humidity. Of course, none of the houses here have climate control, so your experience may vary. Not sure if this is avoidable through proper maintenance or if the wood wasn't dried properly or what. I think it's just the nature of this type of wood and it's reaction to the evironment.
_________________________
~ John
|
|
Top
|
|
|
|
|
#368472 - 10/03/2017 17:25
Re: Finished project
[Re: JBjorgen]
|
carpal tunnel
Registered: 29/08/2000
Posts: 14477
Loc: Canada
|
That's just what wood does (as part of "seasonal wood movement"), due to the differences between tangential and radial shrinkage ratios. It can be compensated for by how a slab is cut at the sawmill, or through construction techniques.
But with a big slab cut from anywhere except dead center down the tree trunk, it will not stay totally flat from season to season. Bracing it with a frame structure to keep it more flat is one solution, though in the long run it may crack/split if prevented from warping. Sealing it with a humidity-blocking finish is another approach, but difficult to achieve in practice.
An interesting tidbit I have learned from the biz, is that platters (cheeseboards, breadboards, trophy mounts, etc..) can be sliced diagonally from a whole trunk segment, in such a way that the tangential and radial shrinkage ends up dead even. So the small platters don't warp (much). Just gotta pick the right angle of cut for the wood species in question.
Cheers
Attachments
 Description: Diagonally sliced platters. Description: Diagonally sliced platters.
|
|
Top
|
|
|
|
|
#368473 - 10/03/2017 18:03
Re: Finished project
[Re: JBjorgen]
|
carpal tunnel
Registered: 20/12/1999
Posts: 31565
Loc: Seattle, WA
|
He would then disassemble the trailer, sell all the wood to help finance his trip, and rebuild the trailer Wait, you're telling me this guy *smuggled mahogany into the US* by building his trailer out of it? That is hilarious and amazing. That's like building a boat out of cocaine. I'm wondering just how much profit one could make by that. Is the price of mahogany in the US so high that it's really worth his time to do the construction/deconstruction?
|
|
Top
|
|
|
|
|
#368474 - 10/03/2017 20:22
Re: Finished project
[Re: JBjorgen]
|
carpal tunnel
Registered: 13/07/2000
Posts: 4172
Loc: Cambridge, England
|
It's not just about import duty. Mahogany is IUCN "vulnerable" and is in CITES Appendix II. Folks should really not be messing with that stuff.
Peter
|
|
Top
|
|
|
|
|
#368475 - 11/03/2017 00:05
Re: Finished project
[Re: peter]
|
carpal tunnel
Registered: 20/12/1999
Posts: 31565
Loc: Seattle, WA
|
Interesting! Looked up the Wikipedia article on it, and learned (among other things) that the Belize coat of arms has a mahogany tree on it.
|
|
Top
|
|
|
|
|
#368476 - 12/03/2017 07:10
Re: Finished project
[Re: tfabris]
|
carpal tunnel
Registered: 19/01/2002
Posts: 3582
Loc: Columbus, OH
|
Interesting! Looked up the Wikipedia article on it, and learned (among other things) that the Belize coat of arms has a mahogany tree on it. Most of the slaves were brought in to cut first logwood, valued in its use of making dyes, then later mahogany. This is because treaties forbade the production of plantation crops. The village I lived in, Gales Point, started out as a settlement of escaped slaves that lived in the area and eventually settled on the peninsula (according to the local lore). Logging is also represented in the flag by the wreath of leaves, the tools pictured in the coat of arms and the motto "Sub Umbra Floreo" which in latin means, Under The Shade I Flourish."
_________________________
~ John
|
|
Top
|
|
|
|
|
#368479 - 17/03/2017 14:44
Re: Finished project
[Re: andy]
|
pooh-bah
Registered: 27/02/2004
Posts: 1900
Loc: London
|
They sound great, can you pop a couple in the mail There are UK firms that do this. One that I looked at did all sorts of strange species; cedar, horse chestnut, tulip etc, all UK grown.
|
|
Top
|
|
|
|
|
#368604 - 10/04/2017 05:04
Re: Finished project
[Re: JBjorgen]
|
carpal tunnel
Registered: 08/03/2000
Posts: 12318
Loc: Sterling, VA
|
I didn't end up getting a track saw and I didn't make a jig, but I'll make one the next time I have a project. I tried just using a straight-edge and some measurement, and while the results are more than adequate for a hall closet, it wouldn't be for anything more.
We have a weird, triangular linen closet in our house, and the stock wire shelves just didn't fit it. Sheets and towels would just cascade over the edge of these shelves that only came out half-way into the closet. So I ditched those and just did the quickest job I could and still make it look passable. I cut up a bunch of triangular pieces of 3/4" plywood, sanded them down, glued half-round molding to the front edge, and set them on some 1x2 cleats attached to studs and toggle bolts.
I should have scribed them to the walls to make them a little tighter fit, but again it's good enough for this spot, and the result was almost a tripling of shelf space.
Attachments
 
_________________________
Matt
|
|
Top
|
|
|
|
|
#368605 - 11/04/2017 11:54
Re: Finished project
[Re: JBjorgen]
|
carpal tunnel
Registered: 29/08/2000
Posts: 14477
Loc: Canada
|
Space gaining solutions like that are always good fun. Congrats!
Note that 1/4" quarter-round molding from the home store is very flexible and can be fitted at the rear of shelves like those to fill any gaps and give a nicely "finished" look to things.
Cheers
|
|
Top
|
|
|
|
|
#368610 - 14/04/2017 03:53
Re: Finished project
[Re: JBjorgen]
|
carpal tunnel
Registered: 19/01/2002
Posts: 3582
Loc: Columbus, OH
|
Well done!
_________________________
~ John
|
|
Top
|
|
|
|
|
#368612 - 14/04/2017 05:06
Re: Finished project
[Re: JBjorgen]
|
carpal tunnel
Registered: 08/03/2000
Posts: 12318
Loc: Sterling, VA
|
Good idea Mark. I might just leave it and save some effort. My wife is happy so that usually means the job is good enough
_________________________
Matt
|
|
Top
|
|
|
|
|
#368613 - 14/04/2017 12:41
Re: Finished project
[Re: JBjorgen]
|
carpal tunnel
Registered: 29/08/2000
Posts: 14477
Loc: Canada
|
I just had another good look at the corner cupboard photos: those wire shelves were tiny!! Looks like a major upgrade with the new shelving!
|
|
Top
|
|
|
|
|
#368620 - 15/04/2017 06:34
Re: Finished project
[Re: mlord]
|
carpal tunnel
Registered: 08/03/2000
Posts: 12318
Loc: Sterling, VA
|
I just had another good look at the corner cupboard photos: those wire shelves were tiny!! I know, right? The length against each wall was only 17.5". A folded towel would just barely stay on the shelf, and one corner would always be hanging over the front part. Looks like a major upgrade with the new shelving! Thanks! I think it is. The new measurement is 28" along each wall. The triangular shape is still annoying (hard to figure out how to pack that), but at least nothing is poised to start an avalanche, and we can store a lot more toiletries and things.
_________________________
Matt
|
|
Top
|
|
|
|
|
#368621 - 15/04/2017 08:42
Re: Finished project
[Re: JBjorgen]
|
carpal tunnel
Registered: 13/07/2000
Posts: 4172
Loc: Cambridge, England
|
Honestly I think whoever designed a triangular linen cupboard into the house in the first place deserves most of the blame here.
Peter
|
|
Top
|
|
|
|
|
#368626 - 15/04/2017 18:00
Re: Finished project
[Re: Dignan]
|
old hand
Registered: 27/02/2003
Posts: 770
Loc: Washington, DC metro
|
Thanks! I think it is. The new measurement is 28" along each wall. The triangular shape is still annoying (hard to figure out how to pack that), but at least nothing is poised to start an avalanche, and we can store a lot more toiletries and things.
Fold your linens into triangles! -jk
|
|
Top
|
|
|
|
|
#368627 - 15/04/2017 18:18
Re: Finished project
[Re: Dignan]
|
old hand
Registered: 29/05/2002
Posts: 798
Loc: near Toronto, Ontario, Canada
|
... The triangular shape is still annoying (hard to figure out how to pack that), but at least nothing is poised to start an avalanche, and we can store a lot more toiletries and things. It would have been a bigger project, but ... Sometimes the inner drywall walls can be removed, allowing the closet interior to be expanded/reconfigured into the newly exposed wall cavities. Exact results and possibilities will depend on what kind of structure detail is found within the walls. Depending on the situation it is possible to just paint the inside of the now exposed drywall surfaces (which is the backside of the 'exterior' drywall surface). In one case I installed vertical plywood panels (carefully crafted as needed to fit) to create a new closet shape, then added a drywall layer directly onto the plywood. In another situation I just painted the plywood surfaces and then attached the shelf hardware with wood screws, no drywall plugs needed. Interior wall cavities behind drywall (for stick built houses) are typically 3.5" deep, sometimes that is enough extra space to make the effort worthwhile. For the closet shown here, it is possible to have the shelf front edges extend into the doorway space, such that the closed closet door would be just shy of touching the extended shelves.
|
|
Top
|
|
|
|
|
#368640 - 16/04/2017 05:12
Re: Finished project
[Re: peter]
|
carpal tunnel
Registered: 08/03/2000
Posts: 12318
Loc: Sterling, VA
|
Fold your linens into triangles! Ha! Yeah we'll do a flag ceremony after every laundry load! Nah, the towel wouldn't fill up the space as a triangle anyway. I tend to just fill the extra room with wash cloths and hand towels. It would have been a bigger project, but ...
Sometimes the inner drywall walls can be removed... No go. Each cleat on both walls is attached to studs. There was one stud behind each wall, and the other cleat fastener is a toggle bolt. Good idea though. Honestly I think whoever designed a triangular linen cupboard into the house in the first place deserves most of the blame here. I can't argue with that. It's a weird design. The center staircase is set at a 45 degree angle to the exterior walls of the house. On a floor plan it would look like a square with a diamond inside it. It's an interesting design element, but it makes for weird areas in the middle of the house.
_________________________
Matt
|
|
Top
|
|
|
|
#368641 - 16/04/2017 13:34
 Re: Finished project
[Re: Dignan]
Re: Finished project
[Re: Dignan]
|
old hand
Registered: 29/05/2002
Posts: 798
Loc: near Toronto, Ontario, Canada
|
... It would have been a bigger project, but ...
Sometimes the inner drywall walls can be removed... No go. Each cleat on both walls is attached to studs. There was one stud behind each wall, and the other cleat fastener is a toggle bolt. Good idea though. ... Sometimes the stud can also be removed All depends on the wall structure. If not loadbearing then it comes down to wall stiffness for supporting the remaining drywall. Hence the plywood (or wall sheathing board) layer which can provide strength and support for the now much thinner wall. In oddball wall shapes and corners sometimes the construction guys just keep adding studs until they get enough edges to attach all the drywall pieces. All that extra vertical wood can take up a lot of useful space. Rethinking the construction details can recover some useful/usable space.
|
|
Top
|
|
|
|
|
#368642 - 16/04/2017 19:45
Re: Finished project
[Re: JBjorgen]
|
carpal tunnel
Registered: 08/03/2000
Posts: 12318
Loc: Sterling, VA
|
That wouldn't work here. There's also wood behind the corner, so the result would just be an even more difficult/complicated shape to create shelves for.
_________________________
Matt
|
|
Top
|
|
|
|
|
|

 Previous Topic
 Index
Index