#172557 - 29/07/2003 14:03
 Mark 2a knob replacing Mark 2 knob?
|
carpal tunnel

Registered: 20/12/1999
Posts: 31636
Loc: Seattle, WA
|
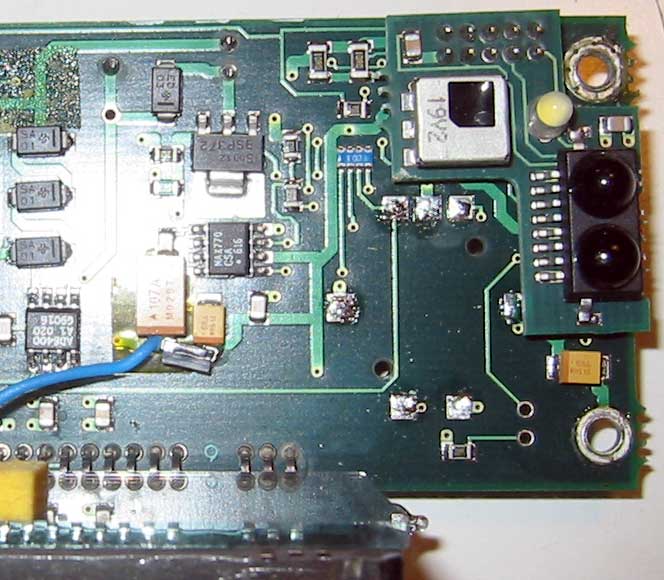
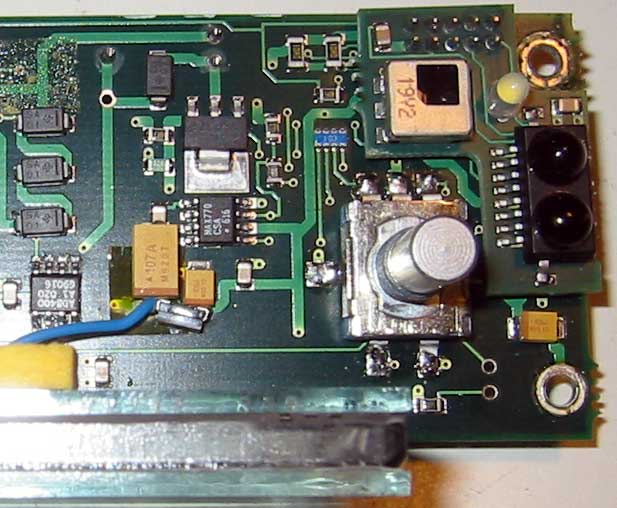
I've got in my hands some new Mark2 and Mark2A knobs courtesy of The Lord.
They appear to have the same pinouts, the only difference is that the 2A knob is through-hole instead of surface-mount. It looks like I could, if I was careful, bend and trim the 2A pins so that I could solder them to my Mk2 surface mount pads, effectively upgrading my knob in the process.
The reason I want to try this is that the 2A knob has a slightly different "feel" to it, and it clicks a bit differently. I think I like it better and I am curious to try it.
So my question is... if I wanted to pioneer this procedure... Would the signals from the 2A knob be the same as the 2 knob, as far as the player hardware, PIC firmware, and software are concerned? Should it "just work" as a solder-in replacement?
|
|
Top
|
|
|
|
|
#172559 - 29/07/2003 22:27
Re: Mark 2a knob replacing Mark 2 knob?
[Re: tfabris]
|
carpal tunnel

Registered: 23/08/2000
Posts: 3826
Loc: SLC, UT, USA
|
I was gonna ask the exact same thing tomorrow. Thanks for beating me to it.
|
|
Top
|
|
|
|
|
#172561 - 30/07/2003 00:13
Re: Mark 2a knob replacing Mark 2 knob?
[Re: tfabris]
|
carpal tunnel
Registered: 20/12/1999
Posts: 31636
Loc: Seattle, WA
|
Ooo! Seems to work. At least on my display board. My display board is a bit unusual, though, since it was a replacement from back stock. It might not be exactly the same as yours.
Loren: use care when desoldering the old knob. I managed to rip the pad out from under one of the tabs on mine and I'm having to mess with it. 
|
|
Top
|
|
|
|
|
#172562 - 30/07/2003 07:12
Removing an encoder from display board.
[Re: tfabris]
|
carpal tunnel

Registered: 25/06/1999
Posts: 2993
Loc: Wareham, Dorset, UK
|
Here's the procedure I use:
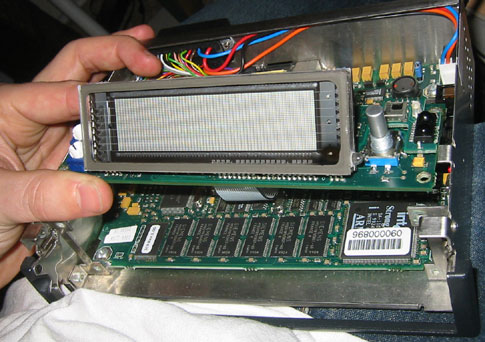
Both boards: CAREFULLY lift up the VFD along the edge furthest from the pins, and break the stiction of the sticky foam pads. Rotate the display around it's soldered pins and move it out of the way.
Mk2 (flat tabs, surface mount): Wick away as much solder as you can from the pads first using solder braid. For the pad under the IR daughterboard, use extra care and a long-tip soldering iron.
Mk2A (pins, through hole): use a solder sucker to get as much solder off the BACK of the display board first.
Both boards: Using fine electronic flat-blade sidecutters, clip the three pads/pins at the top of the encoder, holding the cutters vertical to the board.
Clip the bottom two, again cutting vertical to the board.
Clip the side earth lug/pad on the side of the encoder nearest the VFD, HORIZONTALLY. Be careful you do not stress the tracking on the display board. Try (gently, when you are sure you have cut through this completely) to lift the rotary, and rotate it away sideways in the direction of the IR board so that the bottom of the encoder is exposed. You should be able to tip it about 45 degrees outwards before coming into contact with the IR board. DON"T FORCE IT ANY FURTHER or you will risk ripping the pads off the PCB - I have seen this a few times and it is NOT EASY TO REPAIR!
Again, cutting horizontally, go under the encoder with the sidecutters and clip through the lug/pad under the daughterboard.
Remove the destroyed encoder.
You should now either wick off remaining solder (Mk2) or solder suck away (Mk2A). On both types this will help you remove the debris of the clipped pins. On the 2A, the clipped lugs of the encoder remain in the large holes through the board. I usually heat these with the iron tip and then push the remains through. BE CAREFUL - the board is more important than the component.
Replacing the encoder is pretty simple: first flux the pads, and place the encoder on the board. Make sure the leads go through the board correctly (Mk2A/green) and are not bent: for the other type (Mk2/blue), make sure the two small locating pips go correctly into the PCB.
Solder the pads/pins first (5 in total). Don't over solder.
Mk2 Only: Solder the exposed earth pad. Using a fine tip iron, go under the IR board and heat the other pad FIRST before inserting solder.
Mk2A only: invert the display and solder both of the side lugs on the PCB. DON'T use too much - only solder the small gap between the lug and the PCB hole.
Before you put it all back together, carefully plug it back into your player to test it. Make sure you get the header on correctly, and that nothing in the display or player can short against each other. If it works OK, power off and then remove it again.
Remove the remains of the previous sticky foam pads from the board and VFD. Using either new, or stacked-up double sided foam tape (to give a height of 3mm), fix the VFD back in place after gently bending it back. Make sure th nipple does not clash with the encoder before you apply FINGER PRESSURE ONLY to seal it back down (Tip: I am now building these up with a 1.5 mm layer of closed cell foam about 2 cm square under the display for extra cushioning).
I would emphasize that if you have already decided to remove the encoder, DON'T try to save it. Destroy it as you get it off to ensure that the tracking on the board is not damaged. Destroy the tracking, and you can say goodbye to the display board - there are plenty of encoders available.
Bear in mind that if you change the encoder, you will also need to change the knob to match the encoder.
Although I see more failures of the SMT (blue) encoder than the pin-through (green), note that the blue ones have been in service for longer.
The blue ones have a "softer" rotary action and a longer "push" than the green ones, and I personally prefer the blue to the green.
_________________________
One of the few remaining Mk1 owners...  #00015 #00015
|
|
Top
|
|
|
|
|
#172563 - 30/07/2003 10:13
Re: Removing an encoder from display board.
[Re: schofiel]
|
carpal tunnel
Registered: 20/12/1999
Posts: 31636
Loc: Seattle, WA
|
Hey, thanks Rob!
A couple of additional notes from my personal experience:
- You don't need to install the hard drives to unit-test the newly installed encoder. If you have Hijack installed on your player, you need only to plug in the display board and add power. It will boot to the "no hard disk found contact support" screen, but even on that screen Hijack works and you can bring it up with the longpress, and test the knob-twist from there.
- Mk2 (SMT): If you *do* end up peeling a pad off the board in the process  , find the spot on the board that its trace leads to, where it goes into one of the holes to pop through to the other side of the board. Scrape the copper-lined edges of this hole gently with an x-acto to get the protective coating off and make the copper shiny. Find a very fine wire (I unwound some heavy-gauge stranded copper speaker wire and used one of the strands) and put it through the hole. Then flux both sides and apply solder. Trim the back side. The remaining wire extending from the front side now replaces your lost pad. Note that it's a multilayer board, so do this even if it looks like the hole doesn't go anywhere on the other side of the board.
The blue ones have a "softer" rotary action and a longer "push" than the green ones, and I personally prefer the blue to the green. Don't you mean it the other way around?
For me, the through-hole (green Mk2a) encoder has a less-clicky (less noisy) rotary action and feels like what I would describe as "softer" when I turn it. Although its resistance to accidental turns is greater; I have to exert a bit more deliberate force to turn the knob than on the Mk2 encoder (this is a feature I like). Also, its "push" requires more deliberate force as well, and clicks more positively, but I don't know about "longer". Again, I like this feature since it reduces the number of times I accidentally push the knob when I'm trying to adjust the volume.
Rob, can you think of anything I might do during this procedure that would cause the display to be dimmer? (Other than plugging in the header wrong an blowing a fuse, which I did not do.) At one point, I powered it up to test and the display was noticeably dimmer. Then later, I tried it again and the display was fine. Now, this morning in the car, I'm second-guessing myself as to whether or not thing is as bright as it was yesterday.
|
|
Top
|
|
|
|
#172564 - 14/02/2004 23:28
 Re: Removing an encoder from display board.
[Re: tfabris]
Re: Removing an encoder from display board.
[Re: tfabris]
|
carpal tunnel
Registered: 23/08/2000
Posts: 3826
Loc: SLC, UT, USA
|
Phew. *Exhale*
That was nerve racking. I just replaced the rotary on my MKII since today I got fed up with it jumping to 0db when i'm trying to turn it down. I did it, i'm still tense! =]
Here's the encoder off the board:

|
|
Top
|
|
|
|
|
#172567 - 15/02/2004 00:14
Re: Removing an encoder from display board.
[Re: loren]
|
Carpal Tunnel

Registered: 08/02/2002
Posts: 3411
|
Congrats!
(ignore the crappy solder job)
Seen much worse. 
_________________________
Mk2a 60GB Blue. Serial 030102962
sig.mp3: File Format not Valid.
|
|
Top
|
|
|
|
|
#172568 - 15/02/2004 07:55
Re: Removing an encoder from display board.
[Re: loren]
|
carpal tunnel

Registered: 29/08/2000
Posts: 14548
Loc: Canada
|
A tip for anyone else who tries this: Slip a folded sheet of paper between the displayboard and whatever it's resting on (eg. the player's guts) before applying power -- just to ensure the whole thing doesn't go up in smoke.
Cheers
|
|
Top
|
|
|
|
|
#172569 - 15/02/2004 11:49
Re: Removing an encoder from display board.
[Re: mlord]
|
carpal tunnel
Registered: 23/08/2000
Posts: 3826
Loc: SLC, UT, USA
|
Heh, yeah, i was careful to only rest the far right side of the display board that has no traces against the side of the case. =]
|
|
Top
|
|
|
|
|
#172570 - 15/02/2004 11:55
Re: Removing an encoder from display board.
[Re: loren]
|
carpal tunnel
Registered: 20/12/1999
Posts: 31636
Loc: Seattle, WA
|
Congrats, Loren! So it seems as though you did a straight Mk2->Mk2 replacement rather than upgrading to a 2A knob?
You're going to find, as I did, that the jumpiness of the volume control is not totally the knob's fault. There are times, even with the brand new knob, when it jumps due to CPU/Disk loading on the player. For instance, I'm first booting up the player and it's in the process of filling up the cache, if I try to turn the knob to increase the volume it sometimes jumps more than I want it to because the knob-click events seem (to the lagged player software) to have piled up quickly at the end of the turn instead of slowly spaced out. This makes it think I spun the knob really fast to turn it up fast even though I didn't. I've mentioned this before in other threads, I'm hoping for some kind of software solution that imposes a speed-limit on turning up the volume but not down.
However, the new knob will definitely take care of the biggest part of the problem, so you'll notice a really big improvement.
|
|
Top
|
|
|
|
|
#172571 - 15/02/2004 18:11
Re: Removing an encoder from display board.
[Re: tfabris]
|
carpal tunnel
Registered: 23/08/2000
Posts: 3826
Loc: SLC, UT, USA
|
Yeah, i thought about doing the MkII -> MkIIa encoder replacement, but i figured i'd save my MkIIa encoder for if i ever need it on the MkIIa =]. It did take me a while to decide though... i think i like the MkIIa encoder better.
I did notice some jumps today after some use, but overall it's night and day. I can actually use the hijack menu now without frustration at it missing what i want to select every time i turn the knob.
|
|
Top
|
|
|
|
|
|


 Previous Topic
 Index
Index