#246149 - 10/01/2005 21:43
 Repairs - and the risks of DIY
|
carpal tunnel

Registered: 25/06/1999
Posts: 2993
Loc: Wareham, Dorset, UK
|
I've had a run of some pretty terrifyingly destroyed player units come in for repair recently. Some of them have really required a huge, and I mean Huge anount of work to fix, the majority of which I can't, realisitically, charge for - it would be cheaper for the owner to simply pick another one up off eBay. However, I don't like scrapping these devices, as they are otherwise pretty tough little beasts. There is a finite number of them in circulation, and every one destroyed is one less in the community. There's still a lot of spares left, and a lot or repairable units in my possession that I will be repairing in the future.
The one thing that these "Horror Stories" have had in common (and I'm not pointing the finger at anyone in particular - this is a general message to every owner) is that the owner, or the owner's mate, or someone down at the workshop, has had a go at "fixing" it. The results are sometimes good, but mostly - BAD. 
I can repair a lot of the faults, including pretty major ones, but the majority of my time seems to be sorting out the wreckge resulting from less-than-expert attempts at repairing things after reading the FAQ. The most typical one is the IDE header, which is seen somehow as "The Golden Fix" - it's not, believe me. The tracking around this area is fragile enough without them being badly overheated and then being loosened from the board - instant death to the PCB. Without checking if there are other faults present first, and just dabbing away with a dirty iron and hoping it will fix things, you are taking a big, unqualified risk with your player that it may not survive. The second most frequent - and most difficult to repair - failure is the CS4231A, which is connected to the IDE header (indirectly). It's a notoriously sensitive flower that just needs to be sneezed on to die young  Solder that header at your own risk, and tread gently.
Don't forget something - the more time I have to spend clearing up the wreckage, the more it costs YOU afterwards.
So please, do me a favour - and your own bank balances - think twice before opening the lid and diving in there with your blunderbuss of a soldering iron under a kitchen light.... you may regret it. 
_________________________
One of the few remaining Mk1 owners...  #00015 #00015
|
|
Top
|
|
|
|
#246150 - 10/01/2005 21:49
 Re: Repairs - and the risks of DIY
[Re: schofiel]
Re: Repairs - and the risks of DIY
[Re: schofiel]
|
carpal tunnel

Registered: 20/12/1999
Posts: 31636
Loc: Seattle, WA
|
Do you want me to change that section of the FAQ? Any suggestions of what I should say?
|
|
Top
|
|
|
|
#246151 - 10/01/2005 23:24
 Re: Repairs - and the risks of DIY
[Re: schofiel]
Re: Repairs - and the risks of DIY
[Re: schofiel]
|
old hand
Registered: 16/02/2002
Posts: 867
Loc: Oxford, UK
|
I really just want to back up what Rob S is saying here and add my 2 cents along the way. I've repaired thousands of electronic/electrical items and I have to say that the worst repairs to undertake are generally the ones when you're not the first person on the job. That's not even to say that the first repairer made a mess of things to be honest, although, sadly, it's more often than not the case To a knowledgeable engineer, electronic components and their fault mechanisms can be simplistic in nature and the remedial course of action, while not necessarily quick or easy to perform, is quite apparent and well understood. If you add to that mix the random unknown elements of a previous engineer, no matter how good or (usually) how bad they are, it can can transition the work into the realms of "uneconomical" all too readily. As an example of how this can happen on both levels, while waiting to be served at trade counters, I often witnessed Johnny coming in and asking for a fuse and a transistor for his TV - he'd tested them and they'd both blown. Quite often I'd know the set/chassis and its symptoms and I'd know that the transformer (and/or other components) was a goner too. Because the cause still existed I also knew that if Johnny just replaced the fuse and transistor they'd both blow (instantly) and almost certainly do a whole lot more damage further up the chain than had been done already. Imagine receiving a repair like this; it should have required a thingamabob and a doobry replacing/checking. It now needs the fromitz board, flux capacitor and the 10ohm bedistor changing too, and that's after the extra time (money) taken to diagnose it, not good. When I used to do repairs I'd aim to spend 15-20 minutes at most on my pre-estimate diagnosis, this included writing up a brief estimate with approximate component costs. Sometimes I could confidently do this without even opening the casing on whatever it was and at other times I'd end up spending 5+ hours diagnosing the damn thing - time lost with no income but sometimes your work ethic meant that you couldn't just walk away and say "sod it, not worth it" and condemn the unit to the scrapheap. It just happens like that, it gets personal -- but not the kind of personal where the customer is hassling you every 10 minutes, those units tend to be B.E.R.  (Pushy / obnoxious customers please take note!) I could be wrong here but I bet I'm not; Rob S probably can't bear to see an empeg that originally needed (say) 1 hour's work, sat there in front of him subsequently needing 5+ hours T.L.C. to cobble PCB tracks together in order to resurrect it etc. The owner won't want to pay for all that which in turn means that Rob doesn't get paid and everybody loses. Not to mention that that's another empeg out of circulation. When I worked in electronic repair (I don't any more), I came to realise that EVERYONE (alsolutely no exceptions here) had a friend who is either an electronics or a computer expert - why people ever bothered coming to me with repair work completely baffled me  Be choosy who you entrust your EOL empeg repairs to!
|
|
Top
|
|
|
|
|
#246152 - 11/01/2005 05:34
Re: Repairs - and the risks of DIY
[Re: AndrewT]
|
carpal tunnel
Registered: 20/12/1999
Posts: 31636
Loc: Seattle, WA
|
Quote:
it should have required a thingamabob and a doobry replacing/checking. It now needs the fromitz board, flux capacitor and the 10ohm bedistor changing too
Clearly, you've been doing electronics repairs for many years. You've certainly got all the terminology down! 
|
|
Top
|
|
|
|
|
#246153 - 11/01/2005 10:42
Re: Repairs - and the risks of DIY
[Re: schofiel]
|
addict

Registered: 04/09/2004
Posts: 553
Loc: Oklahoma
|
I can vouche for Rob S. (although it seems as he was speaking directly to me! Ha!). I had a dead unit (my good one still playing) so I opened it up and removed the main board. I almost trashed it there by breaking a componenet and almost destroying a trace thingine ( do I have the terminology down, Tony). Since my magic stare did not fix it (go figure!), I sent it to Rob S. He has spent many hours (I think) on it. It turns out that this unit is one that he previously repaired, sent out in perfect working order, then someone that got it before me decided to 'play'... and did some serious damage. Then I come along in my infantile wisedom, and make matters worse. This has to be heartbreaking AND fustrating for Rob, and others who, treat these 'children' as their own, trying to nurse them back to health. So, to close I have three main points.
1. If it's not broke, don't fix it...
2. If it's broke, don't fix it, get experts in the field to repair.
3. Rob S. and Patrick deserve a pat on the back, an extra brewski, and a few dollars in the paypal account for their ethical and superb skills and ethics! Thank you, guys!
_________________________
The only easy day...was yesterday!
|
|
Top
|
|
|
|
|
#246154 - 11/01/2005 19:13
Re: Repairs - and the risks of DIY
[Re: Ladmo]
|
enthusiast

Registered: 17/08/2000
Posts: 334
Loc: Seattle, WA. USA
|
As someone with a player in for repair with Rob, this makes me very nervous...
DISCLAIMER: I don't own a soldering iron, nor would I even wave one anywhere near my empeg.
_________________________
Brian H. Johnson
MK2 36GB Blue, currently on life support
"RIP RCR..."
|
|
Top
|
|
|
|
|
#246155 - 11/01/2005 22:44
Re: Repairs - and the risks of DIY
[Re: tfabris]
|
old hand
Registered: 16/02/2002
Posts: 867
Loc: Oxford, UK
|
Quote:
Quote:
it should have required a thingamabob and a doobry replacing/checking. It now needs the fromitz board, flux capacitor and the 10ohm bedistor changing too
Clearly, you've been doing electronics repairs for many years. You've certainly got all the terminology down!
Thank you. I purposefully held back on mentioning the wotsname - there's no sense in unnecessarily confusing people with terminology.
Apart from the thingamabob, the flux capacitor and the doobry, I was wondering whether anyone else here might recognise the other components; the [10 centimetre] Fromitz board and the 10ohm bedistor, no takers so far?
Edit: Typo
Edited by AndrewT (11/01/2005 22:54)
|
|
Top
|
|
|
|
|
#246156 - 12/01/2005 03:04
Re: Repairs - and the risks of DIY
[Re: AndrewT]
|
carpal tunnel

Registered: 08/07/1999
Posts: 5561
Loc: Ajijic, Mexico
|
there's no sense in unnecessarily confusing people with terminology.
When I pretend like I know what I'm talking about when discussing things with people who know even less than me, I generally refer to the "...inverse capacitance bias modulation rectifier."
You'd be surprised how many people think I serious.
tanstaafl.
_________________________
"There Ain't No Such Thing As A Free Lunch"
|
|
Top
|
|
|
|
|
#246158 - 12/01/2005 09:17
Re: Repairs - and the risks of DIY
[Re: tanstaafl.]
|
addict

Registered: 10/11/2000
Posts: 497
Loc: Utah, USA
|
Quote:
... I generally refer to the "...inverse capacitance bias modulation rectifier."...
I always used "dielectric pressure driver", although I'm not quite sure where I got it from.
I know it dates back to when worked at Radio Shack for a while, and lots of people had the nasty habit of bringing in broken electronics to see if we could repair them. I, along with 99.99% of Radio Shack employees, knew absolutely nothing about electronics, but people didn't seem to accept that. So, whenever anyone brought in a busted piece of equipment, I'd pull out the multimeter, set it to the continuity tester, and poke around the board a few times with the leads. After a few pokes, I'd get the leads on the same trace so that the buzzer would sound. "Ahh, there's your problem. The dielectric pressure driver's gone bad. I can work up an exact estimate for you if you'd like, but it's defintely gonna cost more to fix this tv/stereo/computer/toaster than it would be to just get a new one. So, walk over here with me and I'll show you our brand new line of tvs/stereos/computers/toasters."
It was either that or tell them that I needed to send it away to get its thurman checked.
_________________________
-Aaron
|
|
Top
|
|
|
|
|
#246159 - 13/01/2005 16:09
Re: Repairs - and the risks of DIY
[Re: tanstaafl.]
|
carpal tunnel
Registered: 20/12/1999
Posts: 31636
Loc: Seattle, WA
|
Quote:
I generally refer to the "...inverse capacitance bias modulation rectifier." You'd be surprised how many people think I serious.
Obligatory link to a friend's song lyric on the subject.
|
|
Top
|
|
|
|
#246160 - 14/01/2005 01:58
 Re: Repairs - and the risks of DIY
[Re: tanstaafl.]
Re: Repairs - and the risks of DIY
[Re: tanstaafl.]
|
journeyman
Registered: 09/03/2001
Posts: 71
Loc: Alice Springs - Australia
|
"Linear Pressure Adjustment" Generaly refers to smacking it with a Hammer.
|
|
Top
|
|
|
|
#246161 - 19/01/2005 21:35
 Re: Repairs - and the risks of DIY
[Re: schofiel]
Re: Repairs - and the risks of DIY
[Re: schofiel]
|
carpal tunnel
Registered: 25/06/1999
Posts: 2993
Loc: Wareham, Dorset, UK
|
I'm now going to advise generally that if you believe you have some sort of issue with the soldering of the IDE header, DO NOT try to solder it yourself, unless:
- you are highly experienced with a soldering iron
- you have a 0.5 mm, ball-tip soldering iron
- the iron is a temperature controlled, set to around 350 - 375 degrees centigrade
- the iron is a core earthed professional unit
- you are using a silver based high-quality solder, 0.6 mm
- you are using a high-quality liquid flux with non-corrosive qualities
If you are going to do this (and I would recommend highly that you DO NOT ), then please, please, please do NOT overheat the joints or the PCB pads, and ensure that you are properly earthed before you solder the pins.
Carrying out this proceedure carries a high risk that you will damage both the PCB (terminal) and the CS4231A sound chip (not terminal, but possibly so). This secondary damage can occur easily due to the IDE header being directly connected to the data lines of the 4231A data bus.
There are replacement chips available, but this chip is notoriously fragile, and is difficult to replace due to it's awkward position on the PCB, small size, and high lead density. If during removal the PCB tracks are dislodged, then the board is total loss and your player is a write-off.
You have been warned!
Edited by schofiel (20/01/2005 00:16)
_________________________
One of the few remaining Mk1 owners... #00015
|
|
Top
|
|
|
|
|
#246162 - 20/01/2005 05:32
Re: Repairs - and the risks of DIY
[Re: schofiel]
|
pooh-bah

Registered: 15/01/2002
Posts: 1866
Loc: Austin
|
|
|
Top
|
|
|
|
|
#246163 - 20/01/2005 22:50
Re: Repairs - and the risks of DIY
[Re: schofiel]
|
pooh-bah
Registered: 15/01/2002
Posts: 1866
Loc: Austin
|
thought id post this here my friend was putting my empeg into his truck (i had two, so we had installed one sled in his truck) and he accidentally dropped it 5 feet to the asphalt. he then bought it from me, but thats an aside. the immediate damage, aside from the akward silence during the drive to lunch after i asked if he 'threw my empeg?!', was that the hdd was not found. no biggie, i took it apart and reseated the cable. worked fine. fast forward a few months. today, again on the way to lunch, he puts it (now his empeg) into his truck, and gets a no hdd found. i pull the top and it appears that the cable has loosened itself a bit. just one half of the cable was loose. the header pins on the side opposite the display board were exposed a bit. i take it to him and ask if he can spot the problem. after we look at it some more, i take it down the hall to throw it under a cool microscope thing. here is what we discovered. that will get repaired in the future, but i just wanted to point out that the solder contacts are not broken. and there are obvious signs of stress having been applied to the header.
|
|
Top
|
|
|
|
#246164 - 21/01/2005 10:18
 Re: Repairs - and the risks of DIY
[Re: RobotCaleb]
Re: Repairs - and the risks of DIY
[Re: RobotCaleb]
|
carpal tunnel
Registered: 25/06/1999
Posts: 2993
Loc: Wareham, Dorset, UK
|
Don't tell me: the cable you have in this player is grey with a black stripe?
_________________________
One of the few remaining Mk1 owners... #00015
|
|
Top
|
|
|
|
|
#246165 - 21/01/2005 10:48
Re: Repairs - and the risks of DIY
[Re: schofiel]
|
addict
Registered: 04/09/2004
Posts: 553
Loc: Oklahoma
|
Quote:
Don't tell me: the cable you have in this player is grey with a black stripe?
What does the grey cable with a black stripe indicate?
_________________________
The only easy day...was yesterday!
|
|
Top
|
|
|
|
|
#246166 - 21/01/2005 10:50
Re: Repairs - and the risks of DIY
[Re: Ladmo]
|
carpal tunnel

Registered: 17/01/2002
Posts: 3996
Loc: Manchester UK
|
That it's an original one.
_________________________
Cheers,
Andy M
|
|
Top
|
|
|
|
|
#246167 - 21/01/2005 13:41
Re: Repairs - and the risks of DIY
[Re: schofiel]
|
pooh-bah
Registered: 15/01/2002
Posts: 1866
Loc: Austin
|
since you dont want me to tell you, i shall tell tonyc. hey Tony, this cable is grey with a black stripe.
|
|
Top
|
|
|
|
|
#246168 - 21/01/2005 15:25
Re: Repairs - and the risks of DIY
[Re: andym]
|
carpal tunnel
Registered: 25/06/1999
Posts: 2993
Loc: Wareham, Dorset, UK
|
No, that it's the replacement (short) one.
_________________________
One of the few remaining Mk1 owners... #00015
|
|
Top
|
|
|
|
|
#246169 - 21/01/2005 16:43
Re: Repairs - and the risks of DIY
[Re: RobotCaleb]
|
carpal tunnel
Registered: 25/06/1999
Posts: 2993
Loc: Wareham, Dorset, UK
|
Case in point, then: the player has the replacement cable which has too short a distance between the IDE board connector and the first drive connector. The unit has had the impact, the sled moved (as designed) but then swung around the (too short) cable. Since the disk connector is in the line of the moment inertia of the sled/disk, this connector won't come off. Since the IDE header connector is at right angles to the moment, the result is the connector tries to pull off and a large sideways force is applied to the connector on the board.
Results:
- in some cases, the disk connector tries to twist off the disk, but not completely
- the IDE connector either pulls off completely, or the header is damaged, sometimes by bending over towards the front of the unit, or by breaking tracks/solder.
- in some cases, the display cable gets chafed by the "scissor" action of the sled
- in some cases, a mark is made on the back of the display board at the opposite end behind the pushbuttons
Solution:
-open the unit, remove the sled screws and remove drives on the sled by CAREFULLY removing the IDE cable from the board header. DO NOT pull the cable or grip the top of the connector.
- crop approx. 0.5mm from the two large solder lugs for the rotary control protruding from the back of the display board (Mk2A/RIOCar only). Ensure that any cropped metal is retrieved and not allowed to fall into the case or onto the main board
- remove the drives from the sled, dab a drop of superglue under the flange of each end of each shock mount (4 x 2)
- using a Dremel and 2mm reamer, lengthen the drive mounting holes in the sled to the REAR of the sled by 2mm, creating long oval holes (8x)
- re-install the drives further back on the sled so that the lower edge of the drive connector moulding lines up with the front edge of the sled. Ensure that you use the correct diameter 0.5mm thick fibre insulator washers to hold the drives off the sled. Use a single drop of loctite (blue) to hold each of the screws tight. Do them up finger tight with the correct Philips No. 1 screw driver.
- use a new drive cable with an extra connector spaced 5mm further upstream for the first disk drive (second unchanged, cable length unchanged)
- run a bead of hot glue along the bottom of the drive connector/disk to hold it in place
- make a slight pinch to the jumper on the slave drive to ensure a good electrical contact
- dab a blob of hot glue on the jumper to hold it in place
- place a bead of thin plastic beading, 0.5mm diameter, between the pins along the length of the IDE header (slimline connector types ONLY). This ensures that you do not push the back off the connector by forcing it too far down onto the pins.
- (optional) put a blob of glue at each end of the IDE connector to hold it onto the board.
I'm going to post this in expanded form with photos sometime soon. Why am I giving this advice out when I have only just posted to say "Don't DIY"? Because these are modifications that are primarily mechanical, and are precautionary to avoid a lot of the typical failures I have to repair. I still advise - DON'T DIY.
I can carry out this sort of modification work for you if required, and will have the modified cables available by the end of January.
_________________________
One of the few remaining Mk1 owners... #00015
|
|
Top
|
|
|
|
#246170 - 21/01/2005 19:34
 Re: Repairs - and the risks of DIY
[Re: schofiel]
Re: Repairs - and the risks of DIY
[Re: schofiel]
|
carpal tunnel

Registered: 13/02/2002
Posts: 3212
Loc: Portland, OR
|
Dang! Thanks for posting all that. Not because I'd ever try to DIM in the first place, but just because I had no clue about what sort of knowledge goes into such a "simple" repair, never mind the soldering skills.
|
|
Top
|
|
|
|
|
#246171 - 24/01/2005 21:06
Re: Repairs - and the risks of DIY
[Re: schofiel]
|
carpal tunnel
Registered: 25/06/1999
Posts: 2993
Loc: Wareham, Dorset, UK
|
Yet another post in the "Hot Topic!" category.
Patrick and I may have identified a main board failure mode that can occur if you incorrectly re-plug your display cable back onto the board header, off-by-one in a specific direction. It is likely that this, not incorrectly plugging IDE cables, could be the cause of the frequent CS4231A sound chip failures.
It is likely that there will be a relatively straightforward retro-fit solution for this, and as soon as we have worked out the details, we'll let you know.
However, the gilded warning message for now is, if you love your sound chip, when plugging your display cable on/off, ensure that the cable is correctly aligned before re-plugging and powering the unit on. The moment of truth is when you power on the unit - by which time, if you didn't get it right - IT'S TOO LATE
_________________________
One of the few remaining Mk1 owners... #00015
|
|
Top
|
|
|
|
|
#246172 - 24/01/2005 21:40
Re: Repairs - and the risks of DIY
[Re: schofiel]
|
carpal tunnel

Registered: 05/01/2001
Posts: 4903
Loc: Detroit, MI USA
|
The CS4231A failed on my Mk2 way back when and I had never unplugged the display cable. I'm sure you guys are onto something, but there are also instances where the chip can fail without this happening.
_________________________
Brad B.
|
|
Top
|
|
|
|
|
#246173 - 07/02/2005 05:55
Re: Repairs - and the risks of DIY
[Re: schofiel]
|
carpal tunnel
Registered: 08/07/1999
Posts: 5561
Loc: Ajijic, Mexico
|
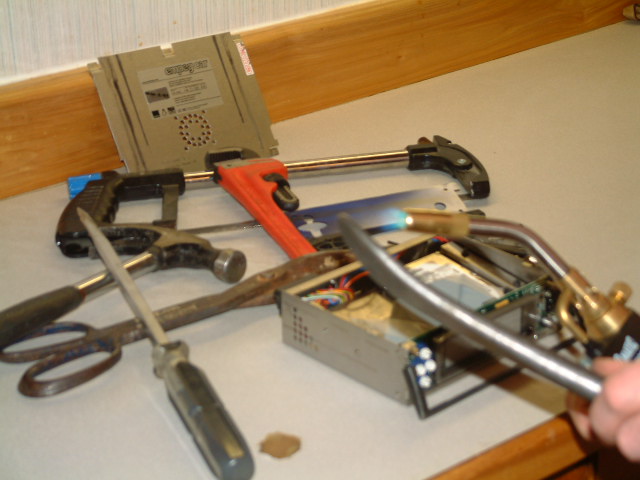
I'm now going to advise generally that if you believe you have some sort of issue with the soldering of the IDE header, DO NOT try to solder it yourself, unless:
OK, I think I'm doing this about right, except I have a few questions (see attached picture for details) These are the proper tools for opening it up, right? I had a heck of a time getting that lid off.
 - you are highly experienced with a soldering iron
Oh, sure -- I solder the ends of the cables on my mountain bike all the time. Keeps 'em from fraying.
- you have a 0.5 mm, ball-tip soldering iron
I'm not all that good with metric stuff -- does my soldering iron look to be about half a millimeter? I guess it's kind of a ball tip -- I mean, the end is somewhat rounded.
- the iron is a temperature controlled, set to around 350 - 375 degrees centigrade
How can I tell when my iron is at 375 degrees? If I hold a meat thermometer against it, will that tell me? I guess I can just wait until the tip of the iron glows a nice orange-red color, that'll be hot enough, won't it?
- the iron is a core earthed professional unit
I scraped most of the dirt ("earth" - is that some kind of British technical term?) off my iron before I started. Does that mean it's a "professional" unit?
- you are using a silver based high-quality solder, 0.6 mm
I don't have any silver-based solder, but I do have some lead ingots that the plumbers left here when they fixed my drain pipes last year. That'll work, won't it? I'm sure that those ingots are at least 0.6 mm, so that ought to be big enough to do the job.
- you are using a high-quality liquid flux with non-corrosive qualities
What is this "flux" stuff? I generally use a mixture of dish soap and battery acid to clean things before I solder them, works a treat! Don't know just how "high quality" the dish soap is, but it's a name brand, and it's for sure liquid. Non-corrosive, too, as long as you don't spill any on you.
Finally, just what is this "IDE Header" thing you're talking about, anyway? What the hell is an IDE? I've heard of "...the IDEs of March..." but that's still weeks away. I don't get it, so I'll just heat up anything I can find that looks shiny, and that oughta take care of it. Right?
I don't know why you're so worried about DIY repairs, Rob. This really doesn't look all that hard to me.

tanstaafl.
Attachments
247977-Fuji0005.JPG (1956 downloads)
Edited by tanstaafl. (07/02/2005 06:12)
|
|
Top
|
|
|
|
|
#246174 - 07/02/2005 15:35
Re: Repairs - and the risks of DIY
[Re: tanstaafl.]
|
carpal tunnel
Registered: 20/12/1999
Posts: 31636
Loc: Seattle, WA
|
Doug, I thought you LIKED Rob? Now you're trying to go and give the poor guy a heart attack.
|
|
Top
|
|
|
|
#246175 - 07/02/2005 17:05
 Re: Repairs - and the risks of DIY
[Re: tfabris]
Re: Repairs - and the risks of DIY
[Re: tfabris]
|
carpal tunnel
Registered: 25/06/1999
Posts: 2993
Loc: Wareham, Dorset, UK
|
GGGGhhhh - Ahhh - ughh {thump}
_________________________
One of the few remaining Mk1 owners... #00015
|
|
Top
|
|
|
|
|
#246176 - 07/02/2005 17:16
Re: Repairs - and the risks of DIY
[Re: schofiel]
|
carpal tunnel
Registered: 20/12/1999
Posts: 31636
Loc: Seattle, WA
|
"He must have died while posting it."
"Come on. If he was dying, he wouldn't bother to type 'ughh', he'd just say it."
"Perhaps he was dictating."
|
|
Top
|
|
|
|
|
#246177 - 22/02/2005 18:01
Re: Repairs - and the risks of DIY
[Re: tfabris]
|
member
Registered: 12/08/2002
Posts: 179
Loc: Manchester, NH
|
How would he hit the send button if he died?
|
|
Top
|
|
|
|
|
#246178 - 22/02/2005 18:10
Re: Repairs - and the risks of DIY
[Re: mvigneau]
|
pooh-bah
Registered: 16/04/2002
Posts: 2011
Loc: Yorkshire UK
|
Quote:
How would he hit the send button if he died
Probably with his head as he collapsed, besides Empeggers never die, they just shuffle along...
_________________________
Politics and Ideology: Not my bag
|
|
Top
|
|
|
|
|
|

 Previous Topic
 Index
Index