#301858 - 03/09/2007 18:50
 Display extender install - 1st steps...
|
addict
Registered: 11/01/2002
Posts: 612
Loc: Reading, UK
|
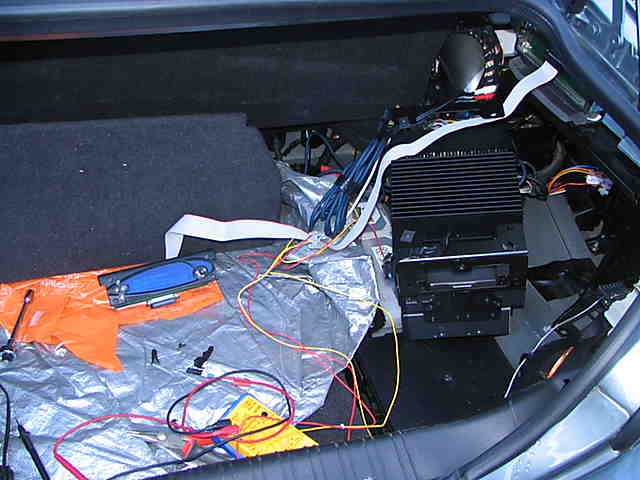
So, as phase 1 of getting the display extended empeg installed I need a remote phono switch.... ( Phase 0 was a success  ) I'll have a two stereo pairs of phono signals in the boot (trunk), 1 from the empeg, 1 from the onboard hifi; I'd like to select which pair goes to the amp. Rather than route them to the cabin and then switch them and route the signal back to the boot (too much chance of interference and too bulky), I'd like to install a switch in the cabin that operates an electronic switch in the boot. It doesn't need soft-switching or anything - I'll turn the amp down when I switch to avoid pops. Anyway, it'll be discarded in phase 3 or 4. Any suggestions? I'm low-level competent with a soldering iron and understand simple circuits (no problems building IR transmitters/receivers - no clue how to design one  ) so I'd be more than happy to buy parts and make something up on some stripboard... PS when I say 'goes to the amp'... The Jag has a complex amp that takes an encoded audio signal and decodes it - I need to tap into the pcb somewhere and take a line-level feed; this will then go to the switch and be replaced by the empeg signal. In a future phase, this signal will go to the empeg as an aux with a vox switch as per here. I'll then replace the OEM amplification/speakers with something nicer...
_________________________
LittleBlueThing
Running twin 30's
|
|
Top
|
|
|
|
|
#301859 - 18/09/2007 01:59
Re: Display extender install - 1st steps...
[Re: LittleBlueThing]
|
pooh-bah

Registered: 19/09/2002
Posts: 2494
Loc: East Coast, USA
|
You could try my favorite, the PIE MPSS-4 source switching relay. It switches not with a button, but based on which device is sending audio. Two of my installs use it this way: - The empeg is powered on all the time. - When the empeg plays, its audio goes to the amp. - When the empeg is in standby, the radio/CD player turns on and sends audio to the amp. - Whenever a button is pressed on the empeg to wake it from standby, the radio/CD is turned off instantly and the empeg has control of the amp again. If you can find an amp turn on lead on the stock radio, than this will work even better. If not, the amp will be on all the time, which may cause pops. I'm having a bit of trouble with two MPSS-4's I bought recently. I'm working with tech support to resolve it. If you'd like to try one, I've got an extra and could sell it to you.
_________________________
- FireFox31 110gig MKIIa (30+80), Eutronix lights, 32 meg stacked RAM, Filener orange gel lens, Greenlights Lit Buttons green set
|
|
Top
|
|
|
|
|
#301860 - 18/09/2007 04:58
Re: Display extender install - 1st steps...
[Re: FireFox31]
|
pooh-bah

Registered: 02/06/2000
Posts: 1996
Loc: Gothenburg, Sweden
|
Quote:
It switches not with a button, but based on which device is sending audio.
Really? My understanding of it is that it is controlled by 2 12V inputs typically connected to the head units remote wires,
with one of the inputs having priority if both inputs are active. Regardless of any unit actually sending audio.
(Which looks to be just what you describe later on) For manual control, just wire the control leads to a switch/switches instead.
There are circuits that will switch due to actual audio signal, located one for a guy on another forum some years ago for
getting GPS voice prompts over the main speakers. Downside is that it takes a fraction of a second to react
and switch over, but that was OK in his case as the prompts started off with an 'attention signal'.
IIRC it was a commercial 'assemble-it-yourself' kit. VOX source switch into google ought to bring up something...
_________________________
/Michael
|
|
Top
|
|
|
|
|
#301861 - 02/10/2007 22:31
Re: Display extender install - 1st steps...
[Re: mtempsch]
|
pooh-bah
Registered: 19/09/2002
Posts: 2494
Loc: East Coast, USA
|
I seem to think the switch is not controlled by the amp remote wires, rather that IT controls them. Since it doesn't rely on the 12V remote wires, at least one of the sources can simply not have a remote wire; hence my iPod switching install.
I don't know, though, maybe you're right. Either way, turn off one source and the other turns on. Works like a champ (unless it's improperly manufactured like two I bought recently).
Good to see you again Mike. I'm finally finishing the iPod install which you gave me electrical information for a while ago!
_________________________
- FireFox31 110gig MKIIa (30+80), Eutronix lights, 32 meg stacked RAM, Filener orange gel lens, Greenlights Lit Buttons green set
|
|
Top
|
|
|
|
|
#301862 - 03/10/2007 18:08
Re: Display extender install - 1st steps...
[Re: FireFox31]
|
pooh-bah
Registered: 02/06/2000
Posts: 1996
Loc: Gothenburg, Sweden
|
Glad to hear it's coming together - though I have no recollection at all what the issue was :-)
Remotes controlling it or the other way around - a matter of perspective I guess, and exactly how you use/wire the switch. I see what you mean though.
But I'm a little surprised that you seem to get a remote out signal even if no remote in is active (I thought the switch effectively OR'ed the remotes from the 2 units together. IE active only if one or both inputs were active...) Or is the non-empeg remote input somehow wired to the iPod or to some other source for 12V? Or is the amp controlled totally independently?
_________________________
/Michael
|
|
Top
|
|
|
|
|
#305515 - 28/12/2007 14:56
Re: Display extender install - 1st steps...
[Re: mtempsch]
|
addict
Registered: 11/01/2002
Posts: 612
Loc: Reading, UK
|
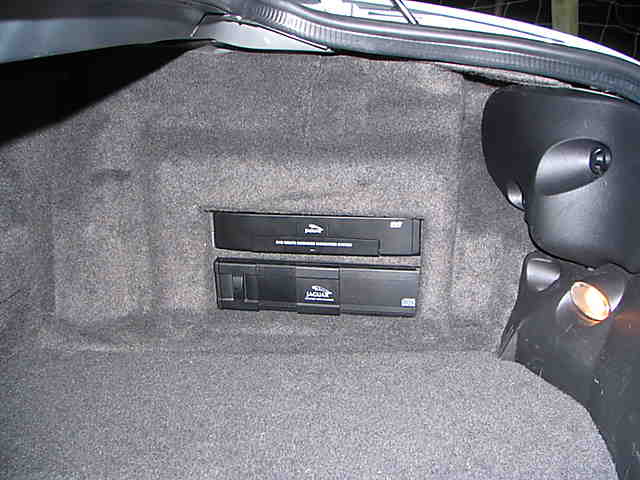
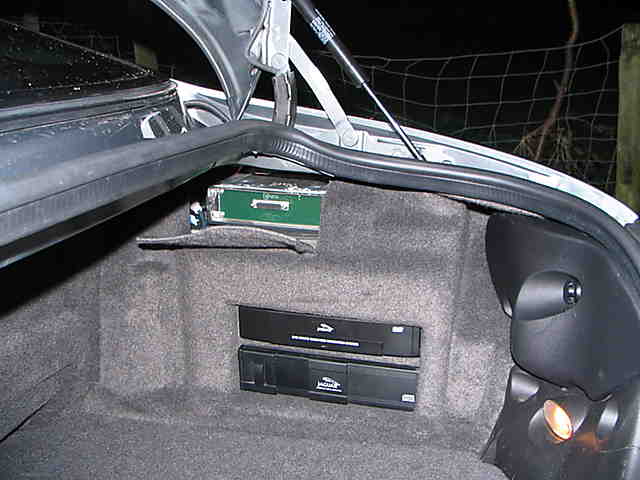
I had a look at these suggestions - thanks guys  I couldn't find anything similar in the UK so after some digging I remembered about latching relays so I've decided to either go down that route or just use the remote-amp-on wire with a vanilla relay to select the audio source - simple really (and to be honest, probably the kind of approach/idea I was after). I finally got round to removing the OEM kit from the boot/trunk today and I have Empeg sound coming from the speakers - good start The next thing I need to do is actually mount the display extender itself. Has anyone else done this yet?
_________________________
LittleBlueThing
Running twin 30's
|
|
Top
|
|
|
|
|
#305551 - 29/12/2007 14:13
Re: Display extender install - 1st steps...
[Re: LittleBlueThing]
|
pooh-bah
Registered: 19/09/2002
Posts: 2494
Loc: East Coast, USA
|
Has anyone else done this yet? I'm waiting to follow your lead (once I get the same car in 2011 or so). Good luck.
_________________________
- FireFox31 110gig MKIIa (30+80), Eutronix lights, 32 meg stacked RAM, Filener orange gel lens, Greenlights Lit Buttons green set
|
|
Top
|
|
|
|
|
#306967 - 06/02/2008 19:54
Re: Display extender install - 1st steps...
[Re: LittleBlueThing]
|
addict
Registered: 11/01/2002
Posts: 612
Loc: Reading, UK
|
So the ribbon cable is now installed and the end pieces need crimping on.
Is this easy? It looks like the crimps just need a straight clamping force. Would I get away with just aligning the ribbon and using a G-clamp?
_________________________
LittleBlueThing
Running twin 30's
|
|
Top
|
|
|
|
|
#306979 - 06/02/2008 23:02
Re: Display extender install - 1st steps...
[Re: LittleBlueThing]
|
pooh-bah
Registered: 12/01/2002
Posts: 2009
Loc: Brisbane, Australia
|
So the ribbon cable is now installed and the end pieces need crimping on.
Is this easy? It looks like the crimps just need a straight clamping force. Would I get away with just aligning the ribbon and using a G-clamp?
Or a vice is better... If you use a G clamp, use some pieces of wood or similar to spread the force all the way across the connector. If you try and clamp one end or the middle, you'll break it.
_________________________
Christian
#40104192 120Gb (no longer in my E36 M3, won't fit the E46 M3)
|
|
Top
|
|
|
|
|
#307026 - 08/02/2008 00:31
Re: Display extender install - 1st steps...
[Re: Shonky]
|
pooh-bah
Registered: 19/09/2002
Posts: 2494
Loc: East Coast, USA
|
Do you plan to make the face removable as a theft deterrent?
_________________________
- FireFox31 110gig MKIIa (30+80), Eutronix lights, 32 meg stacked RAM, Filener orange gel lens, Greenlights Lit Buttons green set
|
|
Top
|
|
|
|
|
#307064 - 08/02/2008 21:39
Re: Display extender install - 1st steps...
[Re: FireFox31]
|
addict
Registered: 11/01/2002
Posts: 612
Loc: Reading, UK
|
No. Three reasons: 1. No-one is going to make the decision to break in to this car based on the presence of an empeg. In fact it's likely to be a deterrent  2. It's just not going to be practical - and that probably goes for anyone doing an extender install. 3. You probably can't see it from outside anyway. I've actually been working on the mount tonight - piccies tomorrow I hope.
_________________________
LittleBlueThing
Running twin 30's
|
|
Top
|
|
|
|
|
#307085 - 09/02/2008 14:38
Re: Display extender - DONE!
[Re: LittleBlueThing]
|
addict
Registered: 11/01/2002
Posts: 612
Loc: Reading, UK
|
so here's one I made last night,
Attachments
 Description: test assemble Description: test assemble Description: some nibbling later and then with filter Description: some nibbling later and then with filter
_________________________
LittleBlueThing
Running twin 30's
|
|
Top
|
|
|
|
|
#307092 - 09/02/2008 14:53
Re: Display extender - DONE!
[Re: LittleBlueThing]
|
addict
Registered: 11/01/2002
Posts: 612
Loc: Reading, UK
|
A *final* shot from the drivers side. I'm really pleased with it - all the OEM sound works perfectly of course; the empeg is just spliced into the AI-Net for the OEM Alpine head unit/amp. Sound quality is OK but not mind blowing. I think I'll look at replacing the speakers next... Mainly we're delighted to have the Empeg back again  Description: In context Description: In context
_________________________
LittleBlueThing
Running twin 30's
|
|
Top
|
|
|
|
|
#307095 - 09/02/2008 15:00
Re: Display extender - DONE!
[Re: LittleBlueThing]
|
carpal tunnel

Registered: 25/12/2000
Posts: 16706
Loc: Raleigh, NC US
|
I thought they got rid of the J-gate shifter.
_________________________
Bitt Faulk
|
|
Top
|
|
|
|
|
#307105 - 09/02/2008 21:16
Re: Display extender - DONE!
[Re: LittleBlueThing]
|
carpal tunnel

Registered: 29/08/2000
Posts: 14548
Loc: Canada
|
Looks great!
How is it at night?
(Handy thing, that dimmer feature)
Edited by mlord (09/02/2008 21:17)
|
|
Top
|
|
|
|
|
#307106 - 09/02/2008 21:21
Re: Display extender - DONE!
[Re: mlord]
|
pooh-bah

Registered: 09/08/2000
Posts: 2091
Loc: Edinburgh, Scotland
|
Wow - I'd have been nervous cutting that too. You must be very happy it all worked and came out looking excellent.
_________________________
Rory
MkIIa, blue lit buttons, memory upgrade, 1Tb in Subaru Forester STi
MkII, 240Gb in Mark Lord dock
MkII, 80Gb SSD in dock
|
|
Top
|
|
|
|
|
#307112 - 09/02/2008 23:18
Re: Display extender - DONE!
[Re: frog51]
|
pooh-bah
Registered: 12/01/2002
Posts: 2009
Loc: Brisbane, Australia
|
Just with the crimp connector: there should have been 3 parts to it. The third is a strain relief. You double back the cable and clip it on. Not explicitly necessary and in this situation probably OK to go without it since there shouldn't be anything tugging on the cable. Just an FYI.
Nice install. I must admit I thought that the first few images with permanent marker and the hole looked a bit rough and ready. End result is nice though. How is it to keep having to look up?
_________________________
Christian
#40104192 120Gb (no longer in my E36 M3, won't fit the E46 M3)
|
|
Top
|
|
|
|
|
#307119 - 10/02/2008 06:07
Re: Display extender - DONE!
[Re: Shonky]
|
old hand

Registered: 07/01/2005
Posts: 893
Loc: Sector ZZ9pZa
|
Scary!
But it looks so nice up there, good job with that. Love the fact that you can prod the buttons on the headlining, the action just instantly makes me think of a aircraft pilot.
Just brilliant. Well done!
|
|
Top
|
|
|
|
|
#307124 - 10/02/2008 13:14
Re: Display extender - DONE!
[Re: frog51]
|
addict
Registered: 11/01/2002
Posts: 612
Loc: Reading, UK
|
I thought they got rid of the J-gate shifter. Eventually - this was probably the very last model to have them. The next year's XK/R was the new shape. Looks great!
How is it at night?
(Handy thing, that dimmer feature) Thanks... Found out last night - it's *BRIGHT*. It's high enough not to distract though. I hadn't originally planned on wiring up the dimmer sensor - I will though. Wow - I'd have been nervous cutting that too. You must be very happy it all worked and came out looking excellent. Oh yes - I was really worried it'd look rough. Especially the shape without the handle. It looks nice though - I think that because we know the handle should be there it looks a touch odd - but I'll ask people who have no idea why it's T-shaped and see what they think. Just with the crimp connector: there should have been 3 parts to it. The third is a strain relief. You double back the cable and clip it on. Not explicitly necessary and in this situation probably OK to go without it since there shouldn't be anything tugging on the cable. Just an FYI.
Nice install. I must admit I thought that the first few images with permanent marker and the hole looked a bit rough and ready. End result is nice though. How is it to keep having to look up? Don't recall seeing a strain relief in the box/bag or on the short 'just so I know it works' run provided - the boot end comes on and off when the unit comes in and although it has lots of slack it may benefit. The main unit has no strain at all. I tidied the edges and the hole up before finishing - the headlining is actually thin fibreglass sheet, 2mm brittle foam, another thin fibreglass sheet, 1mm soft foam and then the fluffy liner. I had to trim the fg sheets a few mm in from the fluffy liner to allow extra material for the edge. Then I dug out the static foam for a few mm to allow the headlining to compress nicely. I already had plenty of photos and I doubt anyone else is nuts enough to install a display extender in the exact same car so you didn't see that bit Looking up is odd - but OTOH I won't be having glare issues! Scary!
But it looks so nice up there, good job with that. Love the fact that you can prod the buttons on the headlining, the action just instantly makes me think of a aircraft pilot.
Just brilliant. Well done! Cheers mate It does indeed feel very aircraft like - and you (or the passenger) needs a steady hand to press the buttons on the move. It's very solid though.You need to come for a quick flight to see for yourself
_________________________
LittleBlueThing
Running twin 30's
|
|
Top
|
|
|
|
|
#307326 - 16/02/2008 13:51
Re: Display extender - DONE!
[Re: LittleBlueThing]
|
pooh-bah
Registered: 19/09/2002
Posts: 2494
Loc: East Coast, USA
|
That install is purely surreal! Who would ever imagine an empeg sticking out of the roof! Great pictures.
So, you ran the display cable from the boot in the headliner??
_________________________
- FireFox31 110gig MKIIa (30+80), Eutronix lights, 32 meg stacked RAM, Filener orange gel lens, Greenlights Lit Buttons green set
|
|
Top
|
|
|
|
|
#307339 - 16/02/2008 20:03
Re: Display extender - DONE!
[Re: FireFox31]
|
addict
Registered: 11/01/2002
Posts: 612
Loc: Reading, UK
|
That install is purely surreal! Who would ever imagine an empeg sticking out of the roof! Great pictures. Thanks - it is different. All the work everyone put into those extenders - it's just great. So, you ran the display cable from the boot in the headliner?? Yes - we'd just got a rather large bill for new tyres and a new headlamp glass so the garage ran the cable for free whilst it was in there. I was looking forward to doing it myself but the headlining is easy to damage apparently so I took the freebie
_________________________
LittleBlueThing
Running twin 30's
|
|
Top
|
|
|
|
|
#311641 - 29/06/2008 00:41
Re: Display extender - DONE!
[Re: LittleBlueThing]
|
member
Registered: 07/10/2000
Posts: 112
Loc: CA, USA
|
Thank you for posting your project. It looks great! It has given me the motivation to start my display extender installation. I'll be stuffing mine (somewhere) into a gen-IV Viper. I have a free year of Sirius satellite radio that doesn't come close to my Empeg. I'll get something posted when done.
|
|
Top
|
|
|
|
|
|


 Previous Topic
 Index
Index